Tutorial
Strix Halo + ROCm 7.1 + Ubuntu 24.04
Install ROCm 7.1 on the AMD Strix Halo (GMKtec EVO X2, AI MAX+ 395) running Ubuntu 24.04 with kernel 6.14 upgrade, AMD GPU drivers, and shared memory (TTM) configuration.
This post contains paid links (affiliate) — how that works.
Contents
I picked up the GMKTec EVO-X2 with the AI MAX+ 395 and the initial experience with the AMD platform for AI was rough. But things seem to already be improving with ROCm 7.1.
This guide focuses on Ryzen AI CPUs. If you are running an older AMD integrated GPU like the 780M or 680M, this will not work. You'll still have to go with the unsupported methods of ROCm if you want to proceed, but those work pretty well as well. It's nice to see the EVO X2s actually having some support out of the box for this type of stuff and not have to do any janky methods.
Installation
Update the Kernel (Required)
sudo apt update && sudo apt-get install linux-oem-24.04cReboot:
sudo reboot nowConfirm the kernel update:
uname -rYou should see version 6.14.0. Then perform a full system update:
sudo apt update && sudo apt upgrade -yDownload and Install ROCm
Download the installer:
wget https://repo.radeon.com/amdgpu-install/7.1/ubuntu/noble/amdgpu-install_7.1.70100-1_all.debInstall it:
sudo apt install ./amdgpu-install_7.1.70100-1_all.debYou may see a permission warning — this is safe to ignore. Now install ROCm:
amdgpu-install -y --usecase=rocm --no-dkmsIf you also have a monitor hooked up and want a graphical user interface with AMD drivers, you can add graphics to the usecase parameter (e.g., --usecase=rocm,graphics). I'm just doing ROCm for my headless system.
This is a large install — around 23 GB — so it does take a little while (about 5-7 minutes).
Add your user to the required groups:
sudo usermod -a -G render,video $LOGNAMEReboot:
sudo reboot nowValidate Installation
Run the validation command:
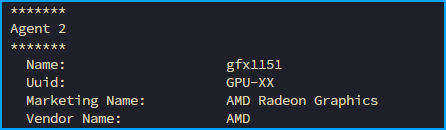
rocminfoLook for Agent 2 in the output. You should see AMD Radeon Graphics with the GFX 1151 or 1150 identifier.
Configure Shared Memory
Install pipx:
sudo apt install pipxAdd pipx to your path:
pipx ensurepathExit and re-open your terminal, then install AMD debug tools:
pipx install amd-debug-toolsCheck current settings:
amd-ttm
The default allocation is approximately 62.23 GB. In future releases of Ubuntu, this will likely be handled automatically, but for now we're going to set this manually.
I'm going to use 115 GB for the shared memory. If you go over 112, you get a warning saying that you have more than 90% assigned to it. Lots of people have run 110 GB just fine. If you're using this system for other things as well — like a Ubuntu desktop you're daily driving — you probably don't want to go this high. Maybe around 100 or 110. I'm only using this for AI, so I just want to dedicate as much as I can to it.
amd-ttm --set 115
Reboot for changes to take effect:
sudo reboot nowVerify the new settings:
amd-ttm
And there you have it. You are now running the latest ROCm with your TTM set correctly for maximum AI shenanigans.
Next Steps
From here you can move on to whatever AI workload you want:
- Text inference with llama.cpp or Ollama
- Image/video creation with ComfyUI