Guide
Get a Domain for Your Homelab
Why a homelab wants a real domain, how to pick one, and how to buy it at Cloudflare for about $10 a year, with nothing in your house exposed to the internet.
Contents
- What You Will End Up With
- Why a Real Domain
- How This Works Without Opening Your Network
- What Becomes Public
- Choosing a Name
- Why Cloudflare
- Step 1: Open the Registrar
- Step 2: Search for Your Name
- Step 3: Check the Order
- Step 4: Pay
- Step 5: Look at What You Bought
- Step 6: Switch On DNSSEC
- Step 7: Read the Public Record
- Step 8: Check It From Your Proxmox Host
- Next Steps
Every service in a homelab starts life as an IP address and a port: http://10.1.30.103:8000. That works until you have ten of them, a browser that warns you about every one, and a family member asking which number is the photos.
A real domain fixes all three. This guide covers why, how to choose one, and how to buy it. I bought bench.rodeo for $10.20 while writing it, and that's the domain every guide after this one uses.
Nothing here opens your network to the internet. The third section explains how that can be true.
What You Will End Up With
- A domain you own, registered at Cloudflare, for roughly $10 a year
- Your name and address hidden from the public record
- DNSSEC switched on
- Proof from your Proxmox host that the domain answers
What you won't have yet is anything using it. Names for your services come in the next guide, and HTTPS in the one after.
Why a Real Domain
Names. paperless.bench.rodeo is easier to remember, type and bookmark than an address and a port.
Certificates browsers trust. For a service on a private address, the way to get a certificate your browser trusts is a name on a real, public domain. With one, every service gets proper HTTPS and the browser warnings stop. A made-up name such as paperless.local can never get one.
Things that insist on HTTPS. Password managers, phone apps and some browser features refuse to work, or work badly, on plain HTTP. They don't care that the service is in your own house.
How This Works Without Opening Your Network
Owning a public domain doesn't put your homelab on the internet. Two separate things happen, and neither one lets anyone in.
Names are answered inside your house. A small DNS server on your own network answers for paperless.bench.rodeo with a private address like 10.1.30.103. Only devices on your network ever ask it. The public DNS for your domain never holds the address of anything you run.
Certificates are proven through DNS. To issue a certificate, Let's Encrypt needs proof that you control the domain. One way to prove it is to put a short text record in the domain's public DNS. A reverse proxy is the piece of software that sits in front of your services and handles HTTPS for them, and a later guide sets one up. It adds that record through Cloudflare's API, Let's Encrypt reads it, and the certificate is issued. Let's Encrypt never connects to your house, so no port is forwarded and nothing is exposed.
So the domain does two jobs: it's the name your private DNS server answers for, and it's what you prove ownership of to get certificates.
What Becomes Public
Buying a domain does publish a few things. Know them before you pick a name.
- The name itself. Anyone can see that the domain exists.
- Your state, and possibly your country. Cloudflare hides your name, email and street address from the public record for free. Its docs say the state and country still show. On mine, only the state does.
- The names on your certificates. Every certificate issued is written to public logs. If you get a certificate for
paperless.yourdomain.com, that name is public. One wildcard certificate, for*.yourdomain.com, avoids this. The HTTPS guide uses a wildcard for exactly that reason.
Choosing a Name
| Do | Why |
|---|---|
| Pick something you'd say out loud | You'll type it and read it to people for years. |
| Check the renewal price, not only the first year | They differ. One .org name I checked was $8.50 for the first year and $11.20 after. |
| Check the ending lets your details stay hidden | Most do. Some don't: .us is one. |
| Avoid | Why |
|---|---|
.local, .home, .lan and other made-up endings | Nobody can own them, so no certificate authority will issue for them. .local is also used by devices to find each other, which causes odd failures. |
.dev and .app | Browsers force HTTPS on every name under these endings. A service you haven't set up HTTPS for yet won't open by name at all. |
| A name with your surname or address in it | It's public, and it will be in your browser's address bar on every screen share. |
Why Cloudflare
You can buy a domain from dozens of registrars. I use Cloudflare for three reasons.
- Price. Cloudflare sells domains at what the registry charges, with no markup. Where the first year is cheaper than the renewal, that's the registry's own discount.
- Privacy is free. Hiding your details from the public record costs nothing extra.
- One account for all of it. The domain, its DNS, and the API token your reverse proxy needs later all live in the same place.
Two things to know before you commit:
WARNING
A domain registered at Cloudflare has to use Cloudflare's nameservers. And a registration can't be refunded: if you buy a name with a typo in it, you own the typo for a year. Check the spelling before you pay.
Step 1: Open the Registrar
Sign in at dash.cloudflare.com. If you don't have an account, use the Sign up link there first. It's free. Confirm your email address when Cloudflare asks you to.
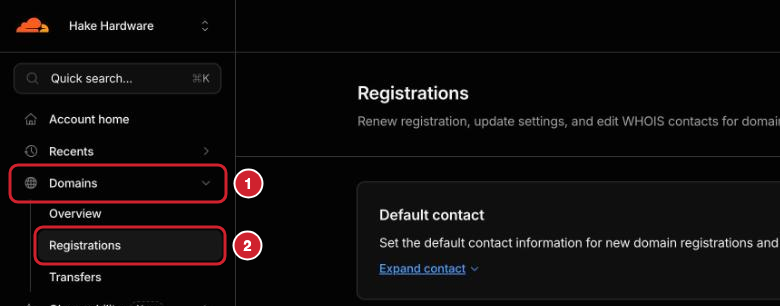
In the left sidebar, click Domains, then Registrations.
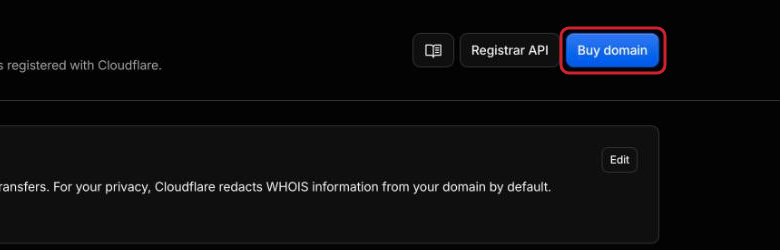
Then click Buy domain at the top right of the page.
Step 2: Search for Your Name
Type the name you want, ending included, and press Enter.
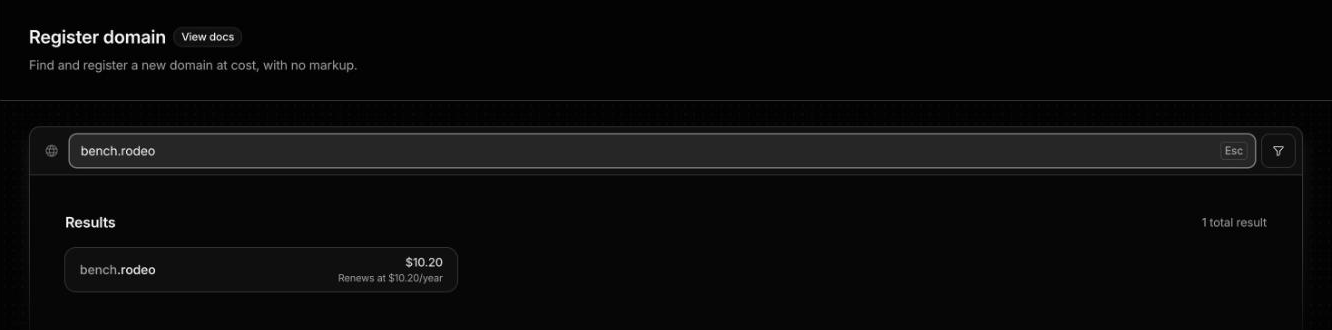
If the name is free, you get a result with two prices: what you pay today, and what it renews at each year. For bench.rodeo both are $10.20. If your name isn't offered, it isn't available through Cloudflare. Usually that means someone owns it. Try another.
Click the result to go to checkout.
Step 3: Check the Order
The checkout page has three things to look at.
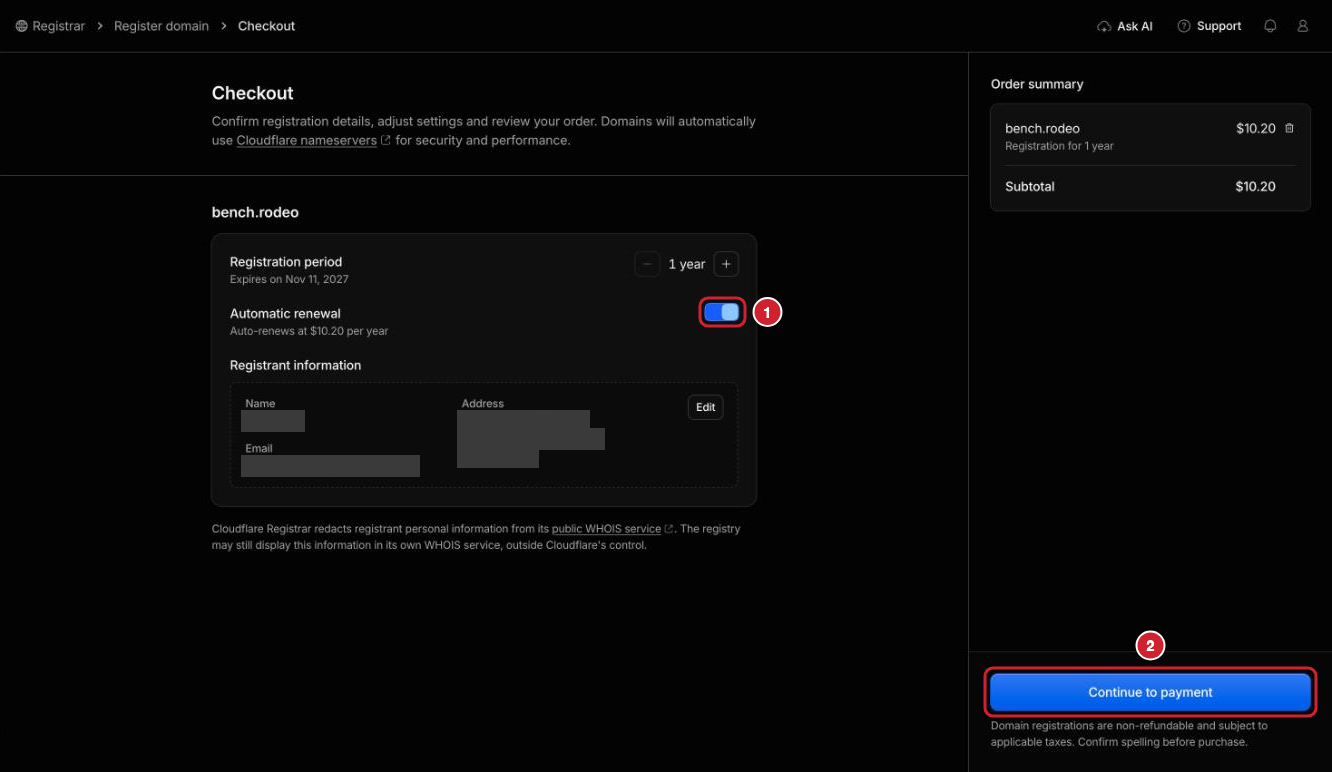
- Registration period. One year is fine. You can add years later.
- Automatic renewal. Leave it on. If a domain lapses, every service name and certificate that depends on it stops working, and someone else can buy it.
- Registrant information. This is who owns the domain. It has to be your real name and address: registrars are required to collect accurate details, and a domain registered with false ones can be suspended. It's hidden from the public record. The grey boxes in the screenshot are covering mine.
I already had contact details and a card on my account, so my screens skip those forms. On a new account Cloudflare asks for both along the way.
On the right, the order summary shows the name, the term and the price. Read the name once more, letter by letter.
Click Continue to payment.
Step 4: Pay
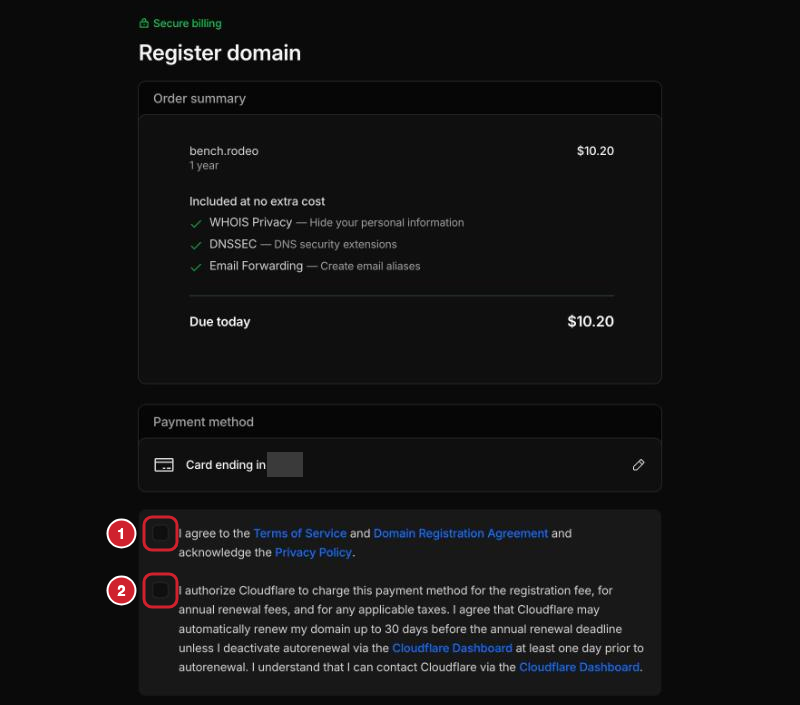
The payment page lists what's included at no extra cost: WHOIS privacy, DNSSEC and email forwarding. Under that is the card on your account.
Tick both boxes. The first accepts Cloudflare's terms and the registration agreement. The second lets Cloudflare charge the card now and at each yearly renewal.
Then click Register domain at the bottom of the page.
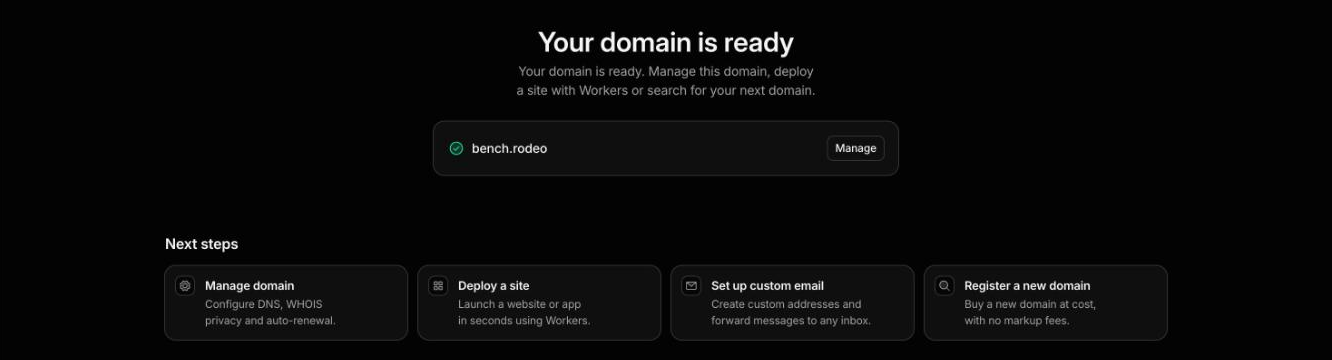
A few seconds later the domain is yours. If Cloudflare emails you asking to verify the registrant's email address, do that now, even if it's a different address from your account's. A domain whose registrant email is never verified can be suspended.
Click Manage.
Step 5: Look at What You Bought
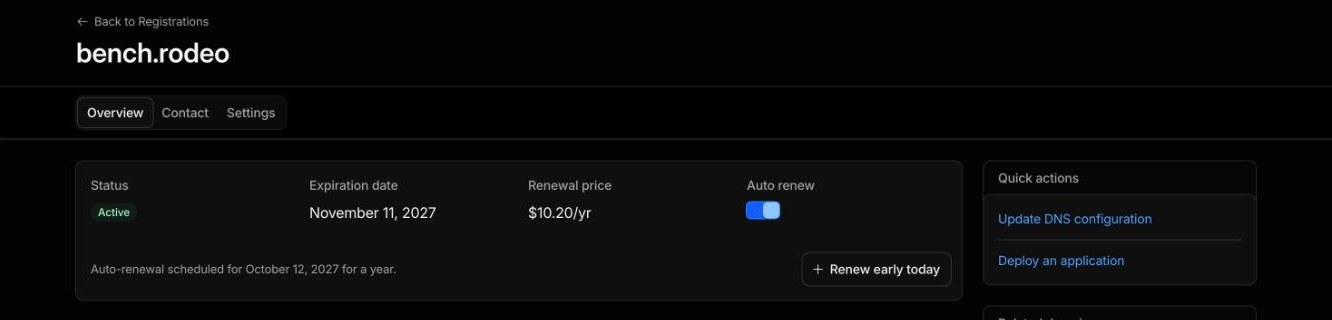
The Overview tab should show Active, an expiry date one year out, the renewal price, and Auto renew switched on.
Step 6: Switch On DNSSEC
DNSSEC is off on a new domain. It signs your domain's DNS answers with a key only Cloudflare holds, and the registry for your domain's ending publishes a fingerprint of that key, so a resolver that checks can spot a forged answer and throw it away. For a homelab it does little, since your domain's public DNS points at nothing, but it's free and does no harm, so switch it on.
Click the Settings tab. The first two cards matter here.
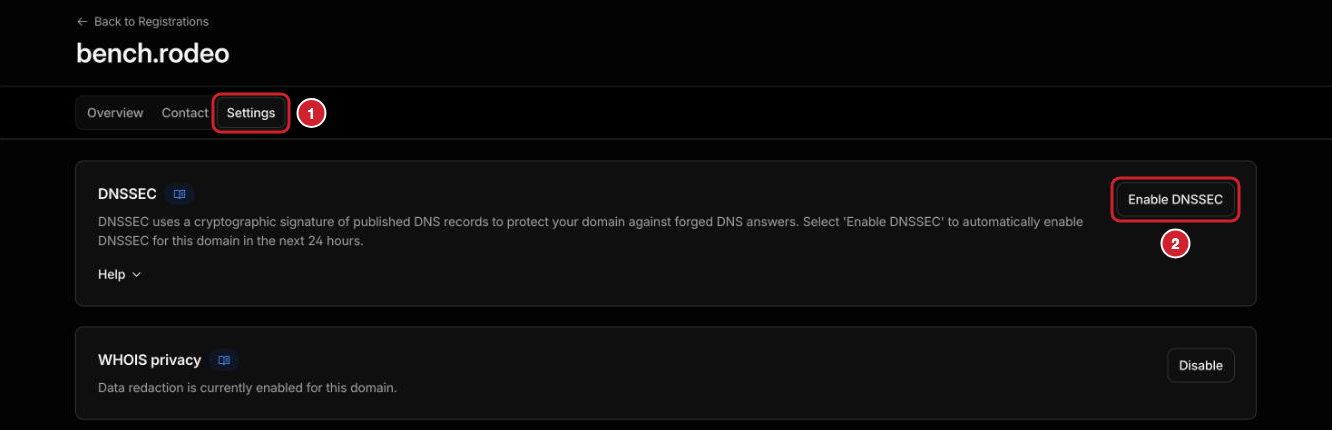
DNSSEC is the first card. Click Enable DNSSEC.
WHOIS privacy, the card under it, should already say data redaction is enabled. That's the setting hiding your details, and there's nothing to change.
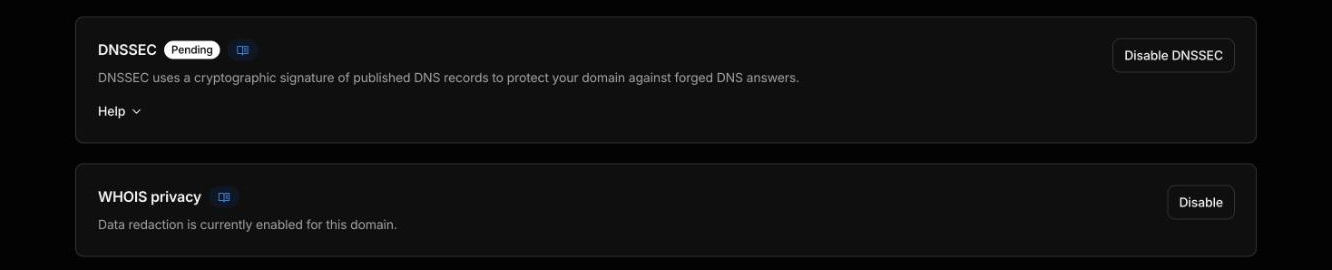
The card changes to Pending. Cloudflare signs your domain's answers straight away, but it now has to pass your key's fingerprint to the registry, and the registry has to publish it. The dashboard says that takes up to 24 hours and Cloudflare's docs say up to two days. For bench.rodeo it took about twenty minutes. You don't have to wait for it: everything else in this guide works while it's pending. Until the registry has the fingerprint, resolvers treat your domain as unsigned and answer for it without checking, the way they did before you clicked.
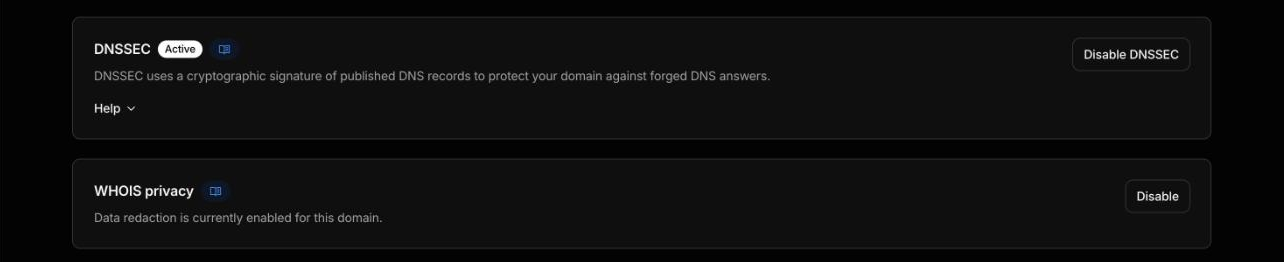
When it's done, the label reads Active.
Step 7: Read the Public Record
Now see what the rest of the world sees. Open rdap.cloudflare.com, type your domain, and press Enter. Scroll to Contact Information.
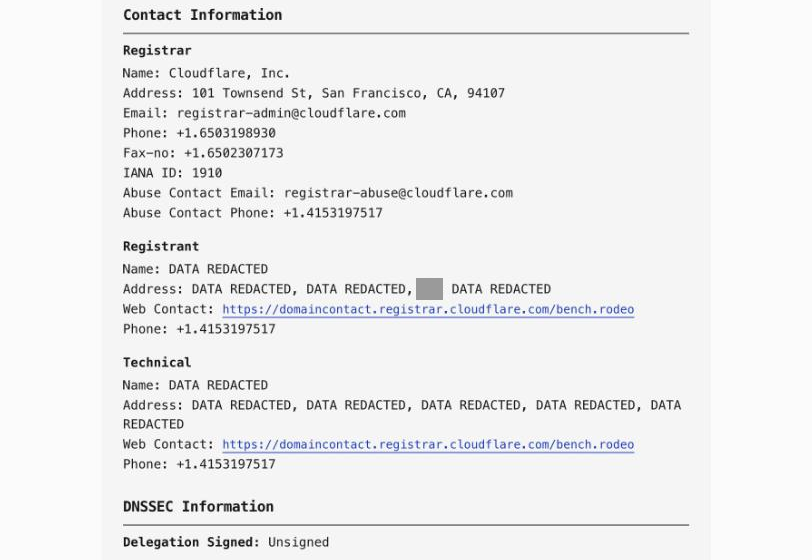
Under Registrant, the name and address should read DATA REDACTED. One part of the address isn't hidden, and that's your state: the grey box in the screenshot is where mine appears. The phone number shown is Cloudflare's, not yours.
That page is Cloudflare's view. The checkout page warned that the registry behind your domain's ending keeps its own record, outside Cloudflare's control. To see that one, look your domain up at lookup.icann.org, which asks the registry directly. For bench.rodeo the registry hides the same details.
At the bottom, Delegation Signed says Unsigned until DNSSEC finishes, and Signed after.
Step 8: Check It From Your Proxmox Host
The last check is from the machine everything else will run on. Open a terminal on your computer: Terminal on a Mac or on Linux, PowerShell on Windows. ssh is normally already there on all three. If yours says the command isn't found, install the OpenSSH client for your system first. Then connect to the Proxmox host as root, its admin user. The part after the @ is the host's address: use your own in place of mine.
ssh root@10.1.30.10The first time you connect, it asks whether you trust this host. Type yes. Then it asks for the root password you chose when you installed Proxmox.
On the Proxmox host, ask the internet which servers answer for your domain, using your own domain in place of bench.rodeo.
dig +short NS bench.rodeodig asks a DNS question and prints the reply. It sends the question to the DNS server your Proxmox host uses, the one you entered when you installed Proxmox, so you're seeing what the internet sees. A question is a name plus the kind of record you want for it:
| Part | What it does |
|---|---|
+short | Prints only the answer. Without it, dig prints a full report: the question it sent, the answer, which server replied and how long it took. That report is useful when something isn't working. |
NS | The kind of record to ask for. NS, short for nameserver, lists the servers that hold the real answers for a domain. Everyone else who answers for it, your resolver included, got the answer from them. |
bench.rodeo | The name to ask about. Put your own domain here. |
You should see two names ending in ns.cloudflare.com. Mine are carlos.ns.cloudflare.com and hope.ns.cloudflare.com, and yours will be a different pair. If nothing comes back, wait a few minutes and try again. A new domain takes a little while to be published: mine answered three minutes after I paid. I also saw this lookup come back empty once more, at the moment DNSSEC switched on, and answer normally a minute later.
Now ask for the domain's address.
dig +short A bench.rodeoThe only change is the record type. An A record holds an IPv4 address, such as 203.0.113.10, and it's what a browser asks for when you type a name. This prints nothing, and that's the result you want. The first command showed the domain exists. This one shows it points at nothing: no address of yours is in the public DNS.
Last, check on DNSSEC.
dig +short DS bench.rodeoDS stands for delegation signer. It's the fingerprint of your key from Step 6, the record the registry publishes to vouch for your domain. It's the one record here that doesn't come from Cloudflare's nameservers: the registry's own servers hand it out.
While DNSSEC is pending this prints nothing. Once it's in force, it prints one line: a few numbers, then a long string of letters and digits. Mine starts 2371 13 2:
| Part | What it means |
|---|---|
2371 | A short ID for the key this fingerprint belongs to. |
13 | How that key signs: ECDSA P-256 with SHA-256, a small, fast kind of signature. |
2 | How the fingerprint was made: SHA-256. |
| The long string | The fingerprint itself. |
That line is what the Active label in the dashboard is reporting.
Next Steps
You now own a domain that points nowhere. The next two guides put it to work:
- Names inside your network. A DNS server on Proxmox that answers
paperless.yourdomain.comwith the service's private address. - HTTPS on everything. A reverse proxy that gets a wildcard certificate for your domain through Cloudflare, with no port opened.
If I helped you learn something, please consider buying me a coffee.
Buy me a coffee