Guide
Install Technitium DNS Server on Proxmox LXC
Give the services in your homelab real names. Technitium DNS Server in a Proxmox LXC, one zone for your own domain, and names that resolve to private addresses.
Contents
- What You Will End Up With
- How the Pieces Fit
- Step 1: Create the Container
- Step 2: Enter the Container and Update It
- Step 3: Install the ASP.NET Core Runtime
- Step 4: Download Technitium
- Step 5: Create the Service User and Its Folders
- Step 6: Install and Start the Service
- Step 7: Check It Answers
- Step 8: Set the Admin Password
- Step 9: Create a Zone for Your Domain
- Step 10: Add Two Records
- Step 11: Check Your Names
- Step 12: Point a Container at It
- Step 13: Point Your Own Devices at It
- Next Steps
This is part 2 of Homelab Foundations. In part 1 I bought bench.rodeo, a domain that points at nothing. This part puts it to work inside the network: a DNS server of your own that answers dns.bench.rodeo with a private address.
If you're starting here, all you need from part 1 is a domain you own. Where you bought it doesn't matter for this part.
The server is Technitium DNS Server, running in its own container on Proxmox. Nothing in this guide is reachable from the internet. Your DNS server answers questions from inside your network only, and it should stay that way: never forward port 53 or port 5380 from your router to it. A DNS server open to the internet gets found and abused.
What You Will End Up With
- An unprivileged Debian 13 LXC running Technitium DNS Server 15.6.2
- A zone for your domain. A zone is the set of names a DNS server holds for one domain.
- Two names in it: one for the DNS server, one for the Proxmox host
- Proof that both resolve, and that the rest of the internet still does too
In this guide the container has CT ID 100 and IP 10.1.30.100, the Proxmox host is at 10.1.30.10, and the domain is bench.rodeo. Substitute your own.
How the Pieces Fit
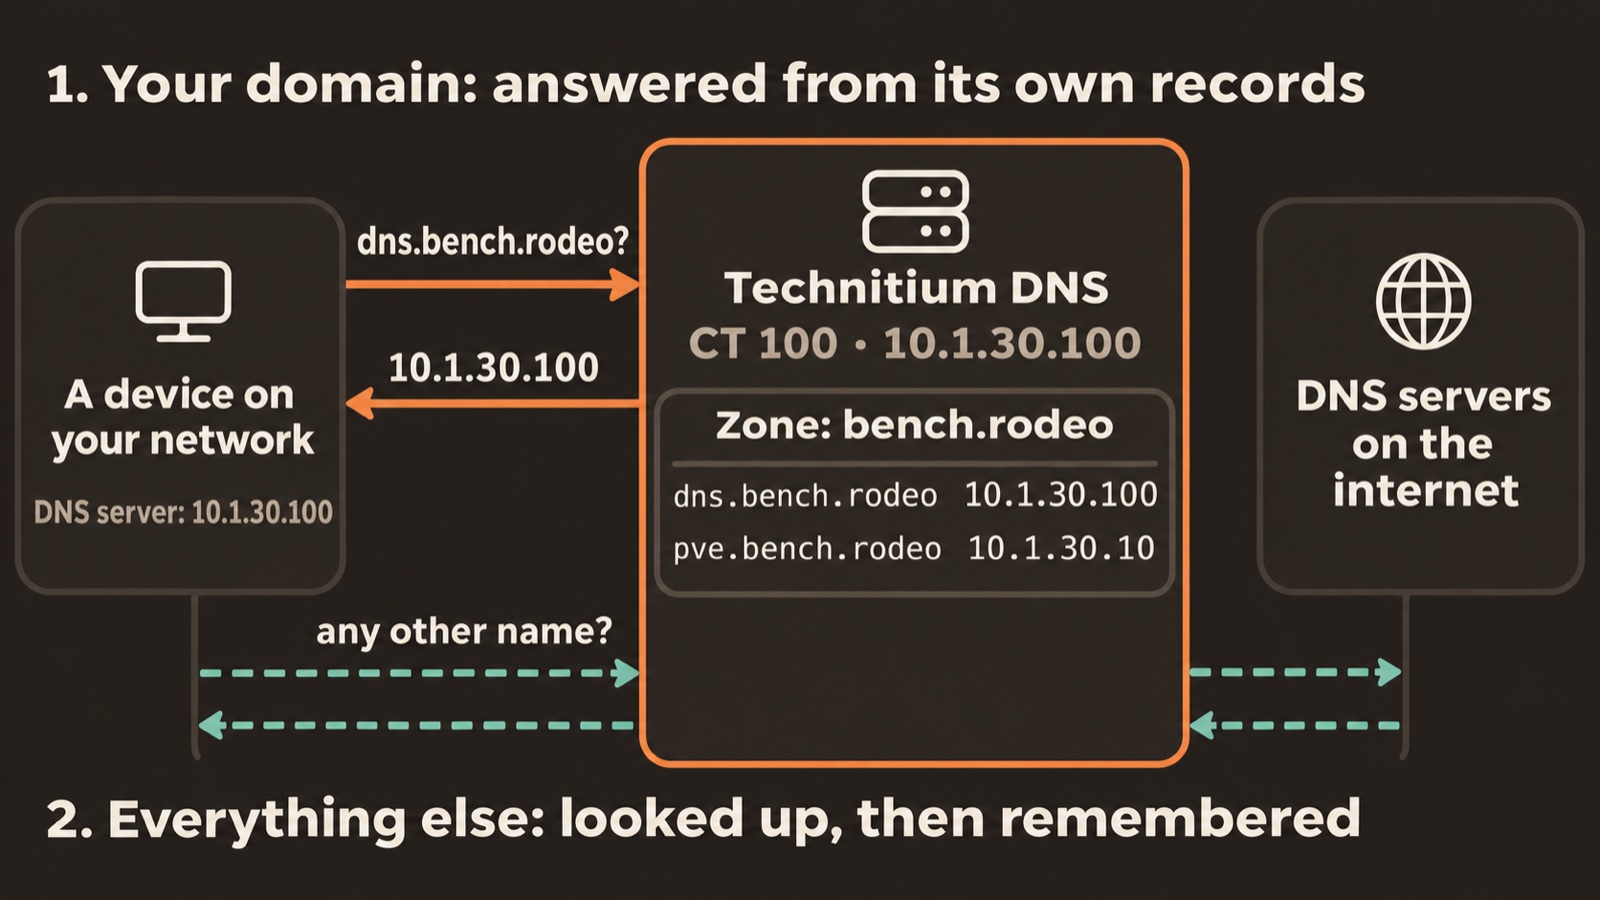
A DNS server does two jobs here.
It answers for your domain. Ask it for dns.bench.rodeo and it replies from its own records with 10.1.30.100. It never asks anyone else about names under your domain.
It looks up everything else. Ask it for any other name and it finds the answer on the internet, remembers it for a while, and passes it back.
A device that uses this server for DNS gets both: your private names and the whole internet.
Step 1: Create the Container
Open a terminal on your computer: Terminal on a Mac or on Linux, PowerShell on Windows. ssh is normally already there on all three. If yours says the command isn't found, install the OpenSSH client for your system first. Then connect to the Proxmox host as root, its admin user. The part after the @ is the host's address: use your own in place of mine.
ssh root@10.1.30.10The first time you connect, it asks whether you trust this host. Type yes. Then it asks for the root password you chose when you installed Proxmox. Everything this guide runs "on the Proxmox host" is typed into this session.
A container starts from a template, a ready-made copy of an operating system. pveam is Proxmox's tool for templates, and update refreshes its list of the ones you can download.
pveam updateFind the current Debian 13 template. Its version number changes every few months. available lists every template there is, and --section system keeps it to plain operating systems, leaving out the ready-made apps. The | hands that list to grep, which prints only the lines containing debian-13.
pveam available --section system | grep debian-13You'll see one line per processor type. You want the amd64 one. When this guide was written it was debian-13-standard_13.6-1_amd64.tar.zst. If yours is newer, use your file name in the next two commands.
Download it. local is the storage it's saved to: every Proxmox host has one by that name, and it's where templates go.
pveam download local debian-13-standard_13.6-1_amd64.tar.zstNow create the container. pct is Proxmox's tool for containers, and create makes a new one. The \ at the end of each line only means the command carries on to the next line, so all of it is one command.
pct create 100 local:vztmpl/debian-13-standard_13.6-1_amd64.tar.zst \
    --hostname dns \
    --cores 1 \
    --memory 1024 \
    --swap 512 \
    --rootfs local-lvm:8 \
    --net0 name=eth0,bridge=vmbr0,ip=10.1.30.100/24,gw=10.1.30.1 \
    --nameserver 1.1.1.1 \
    --unprivileged 1 \
    --features nesting=1 \
    --onboot 1 \
--password| Flag | What it does |
|---|---|
100 | Container ID, the first thing after pct create. Replace with a free ID on your host. |
local:vztmpl/... | The template you just downloaded: local is the storage, and vztmpl is where it keeps templates. Replace the file name if yours is newer. |
--hostname | The container's name. Technitium shows it in its admin page. |
--cores | How many CPU cores it gets. One is plenty for a home DNS server. |
--memory | RAM in MB. The whole container used under 100 MB of this in testing. |
--swap | Swap in MB: disk space it can use as extra memory if it runs out of RAM. |
--rootfs | An 8 GB root disk on the local-lvm pool. Replace local-lvm if your storage has a different name. |
--net0 | Network. name is the network card's name inside the container, bridge is the Proxmox bridge it plugs into, ip is its address, with /24 saying the network is every address that shares the first three numbers, and gw is your router. Replace bridge, ip and gw with your own. A DNS server needs an address that never changes, so this one is fixed. |
--nameserver | The DNS server this container uses for its own lookups, such as fetching packages. 1.1.1.1 is Cloudflare's public one. |
--unprivileged | 1 means yes. Root inside an unprivileged container has no special rights on the host. Keep it: it's the safer default. |
--features | nesting=1 lets systemd inside the container manage its own services. |
--onboot | 1 starts the container when the host boots, so DNS comes back by itself after a restart. |
--password | Asks you for a root password for the container. |
You'll be asked for a root password twice. It's finished when your prompt comes back.
Start the container:
pct start 100It prints nothing when it works.
Step 2: Enter the Container and Update It
From here until Step 7, everything happens inside the container.
On the Proxmox host, in the SSH session from Step 1, open a shell inside CT 100:
pct enter 100Your prompt should now say root@dns. apt is Debian's tool for installing software, and update refreshes its list of what's available.
apt updateThe Debian 13 template ships with no locales generated, but the shell inherits LANG=en_US.UTF-8 from the host. That mismatch makes apt print Setting locale failed warnings on every command. Generating en_US.UTF-8 once stops them, and it takes three commands.
Install the package that builds locales. -y answers yes when apt asks whether to go ahead, so it doesn't stop and wait for you.
apt install -y localesThat package keeps a list of every locale it can build, in /etc/locale.gen, with each line switched off by a # in front. Remove the # from the en_US.UTF-8 line. sed edits text, and here it makes that one change in the file.
sed -i 's/^# en_US.UTF-8 UTF-8/en_US.UTF-8 UTF-8/' /etc/locale.gen| Part | What it does |
|---|---|
-i | Changes the file itself. Without it, sed only prints the changed text. |
s/.../.../ | Swaps the text between the first two slashes for the text between the last two: the line with # in front becomes the same line without it. |
^ | Matches only at the start of a line, so the line has to begin with # en_US. |
'...' | The single quotes pass the whole change to sed exactly as written, spaces and all. |
/etc/locale.gen | The file to change. |
Build every locale that's now switched on.
locale-genYou should see en_US.UTF-8... done.
Now upgrade any packages that have moved since the template was built.
apt upgrade -yStep 3: Install the ASP.NET Core Runtime
Technitium is a .NET application, and its admin page is a small web server. It needs Microsoft's ASP.NET Core Runtime, version 10. Debian doesn't carry it, so it comes from Microsoft's own package feed.
Technitium offers a one-line installer that does all of this for you. I install by hand so every step is one you can read.
First install curl, a tool that downloads files from the web. The Debian template doesn't include it.
apt install -y curlcd changes the directory you're working in. Go to /tmp, so the two files you're about to download land somewhere that gets cleaned up.
cd /tmpDownload the small package that tells apt where Microsoft's feed is and how to verify it. -O saves it under its own name, packages-microsoft-prod.deb, in the directory you're in. Without it, curl prints the file to the screen.
curl -O https://packages.microsoft.com/config/debian/13/packages-microsoft-prod.debInstall it. dpkg is the tool underneath apt that installs a single package file, and -i means install.
dpkg -i packages-microsoft-prod.debRefresh the package list so apt sees what the new feed offers.
apt updateInstall the runtime.
apt install -y aspnetcore-runtime-10.0Check it's there. dotnet is the command the runtime brings with it, and --list-runtimes lists every runtime it can find.
dotnet --list-runtimesYou should see two lines, one starting Microsoft.AspNetCore.App 10.0 and one starting Microsoft.NETCore.App 10.0.
Step 4: Download Technitium
This guide installs one specific version, so the install is repeatable. Store the version number in a variable that the next command uses. This line makes a variable named TECHNITIUM_VERSION, with whatever follows the = as its value. export also passes it on to any program this shell starts. The download doesn't need that part, since the shell fills the value in itself, but it does no harm.
export TECHNITIUM_VERSION=15.6.2The variable lasts as long as this shell. If you close it and come back, run this line again before the download.
TIP
This guide was tested with 15.6.2. Newer versions are listed on Technitium's releases page.
Download that release. It's about 6 MB. Before curl runs, the shell puts the variable's value where ${TECHNITIUM_VERSION} is, so the address ends up with 15.6.2 in it.
curl -O https://download.technitium.com/dns/archive/${TECHNITIUM_VERSION}/DnsServerPortable.tar.gzCreate the directory the application lives in. mkdir makes a directory, and -p makes any missing ones above it too, /opt/technitium here. It also stops mkdir complaining if the directory is already there.
mkdir -p /opt/technitium/dnsUnpack the release into it. tar unpacks archives, and -zxf is three flags written together.
tar -zxf DnsServerPortable.tar.gz -C /opt/technitium/dns| Part | What it does |
|---|---|
-z | Decompresses it with gzip first. The .gz in its name says it's compressed that way. |
-x | Extract, which means unpack. |
-f | The archive is the file named next, DnsServerPortable.tar.gz. |
-C | Unpack into this directory instead of the one you're in. |
It prints nothing.
Step 5: Create the Service User and Its Folders
Technitium runs as its own user, with no login and no home directory, so it has no more access to the container than it needs. useradd creates that user.
useradd --system -M --shell /usr/sbin/nologin --user-group dns-server| Flag | What it does |
|---|---|
--system | A system user, for a service, with a low user ID. |
-M | No home directory. |
--shell /usr/sbin/nologin | Nobody can log in as this user. |
--user-group | Also creates a group of the same name. |
dns-server | The user's name. The service file in Step 6 runs Technitium as this user, so keep it. |
Technitium keeps its settings and zones in /etc/dns and its logs in /var/log/technitium/dns. Create both.
mkdir -p /etc/dns /var/log/technitium/dnsYou made those two directories as root, so root owns them, and Technitium, running as dns-server, couldn't write its settings or logs there. Give them to the new user, and the program directory from Step 4 with them, so everything Technitium uses belongs to the user that runs it. Technitium's own installer does the same with all three.
chown -R dns-server:dns-server /opt/technitium/dns /etc/dns /var/log/technitium/dns| Part | What it does |
|---|---|
chown | Changes who owns files and directories. |
-R | Recursive: changes everything inside each directory as well as the directory itself. |
dns-server:dns-server | The new owner, written as user, a colon, then group. Both are the ones useradd just made. |
| The three paths | The program directory from Step 4, then the settings and log directories. |
-R matters for /opt/technitium/dns, which already holds the hundred or so files you unpacked in Step 4. Without it only the directory itself would change hands, and every file in it would keep its old owner. The other two are still empty, so for them -R changes nothing yet.
Step 6: Install and Start the Service
The release includes a systemd service file. Copy it into place under the name dns. cp copies the first path to the second. /etc/systemd/system is where service files you add go, and systemd names a service after its file, so dns.service makes a service called dns.
cp /opt/technitium/dns/systemd.service /etc/systemd/system/dns.serviceThat file runs Technitium as dns-server, lets it write only to the two directories from Step 5, and gives it the one privilege it needs: listening on port 53, the DNS port.
Tell systemd about it. systemctl is how you give systemd commands, and daemon-reload makes it read its service files again, so it sees the new one.
systemctl daemon-reloadEnable it and start it.
systemctl enable --now dnsenable makes it start with the container, and --now starts it straight away. You'll see one Created symlink line.
Check it. status shows whether the service is running, with its last few log lines. --no-pager prints it all at once, instead of in a scrolling view you'd have to leave with q.
systemctl status dns --no-pagerYou should see Active: active (running).
Leave the container. That puts you back in the SSH session on the Proxmox host, and the rest is done from there and from your browser.
exitStep 7: Check It Answers
On the Proxmox host, ask the new server a question. dig asks a DNS server about a name and prints the reply. +short cuts the reply down to just the answer, the @ says which DNS server to ask, and the name at the end is what you're asking about.
dig +short @10.1.30.100 example.comYou should get one or two IP addresses back. Technitium has no records of its own yet, so this proves the second job from earlier: it went out, found the answer and passed it back.
Step 8: Set the Admin Password
Open http://10.1.30.100:5380 in a browser, using your container's IP. The :5380 is the port: Technitium's admin page listens on 5380, not on 80, the port a browser tries when you don't give one.
The first time, Technitium signs you in as admin and asks for a new password straight away.
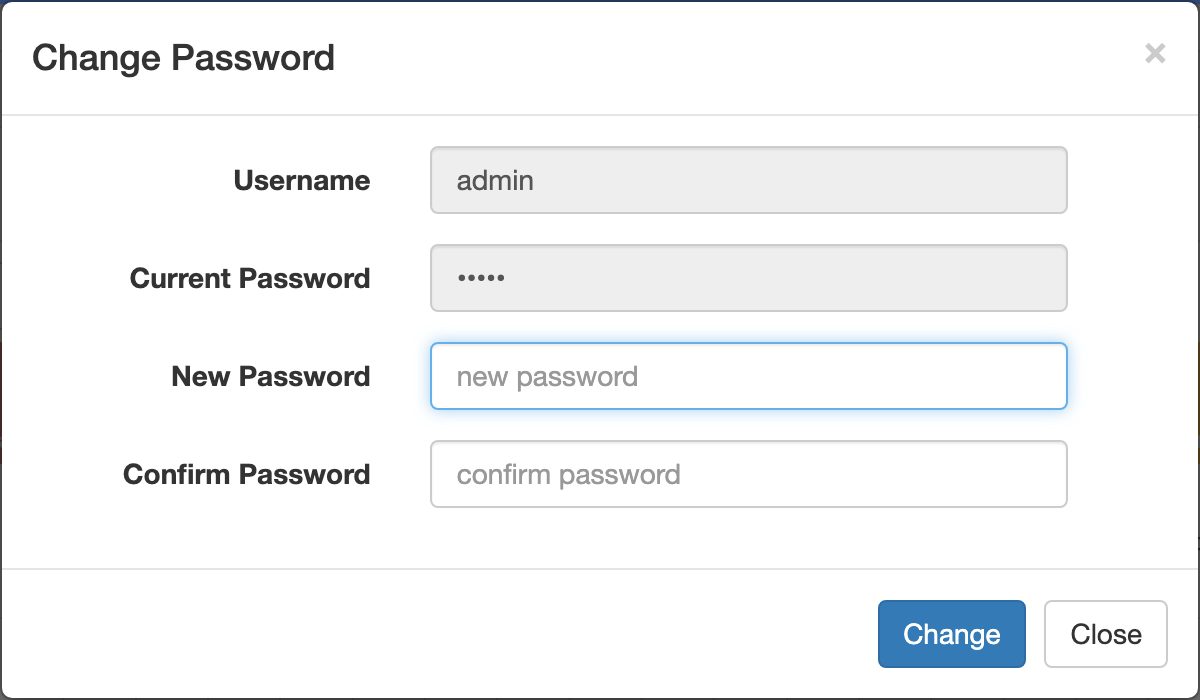
Type a new password twice and click Change. Don't click Close: that skips the change and leaves the default password in place.
WARNING
Do this now. Until you set a password, anyone on your network who opens that address is the administrator.
This page is plain HTTP for now, so use it only from your own network. Part 3 puts it behind HTTPS with a real certificate.
Step 9: Create a Zone for Your Domain
A zone is the set of records for one domain. Creating one for your domain tells Technitium to answer for it from its own records.
Click the Zones tab, then Add Zone.
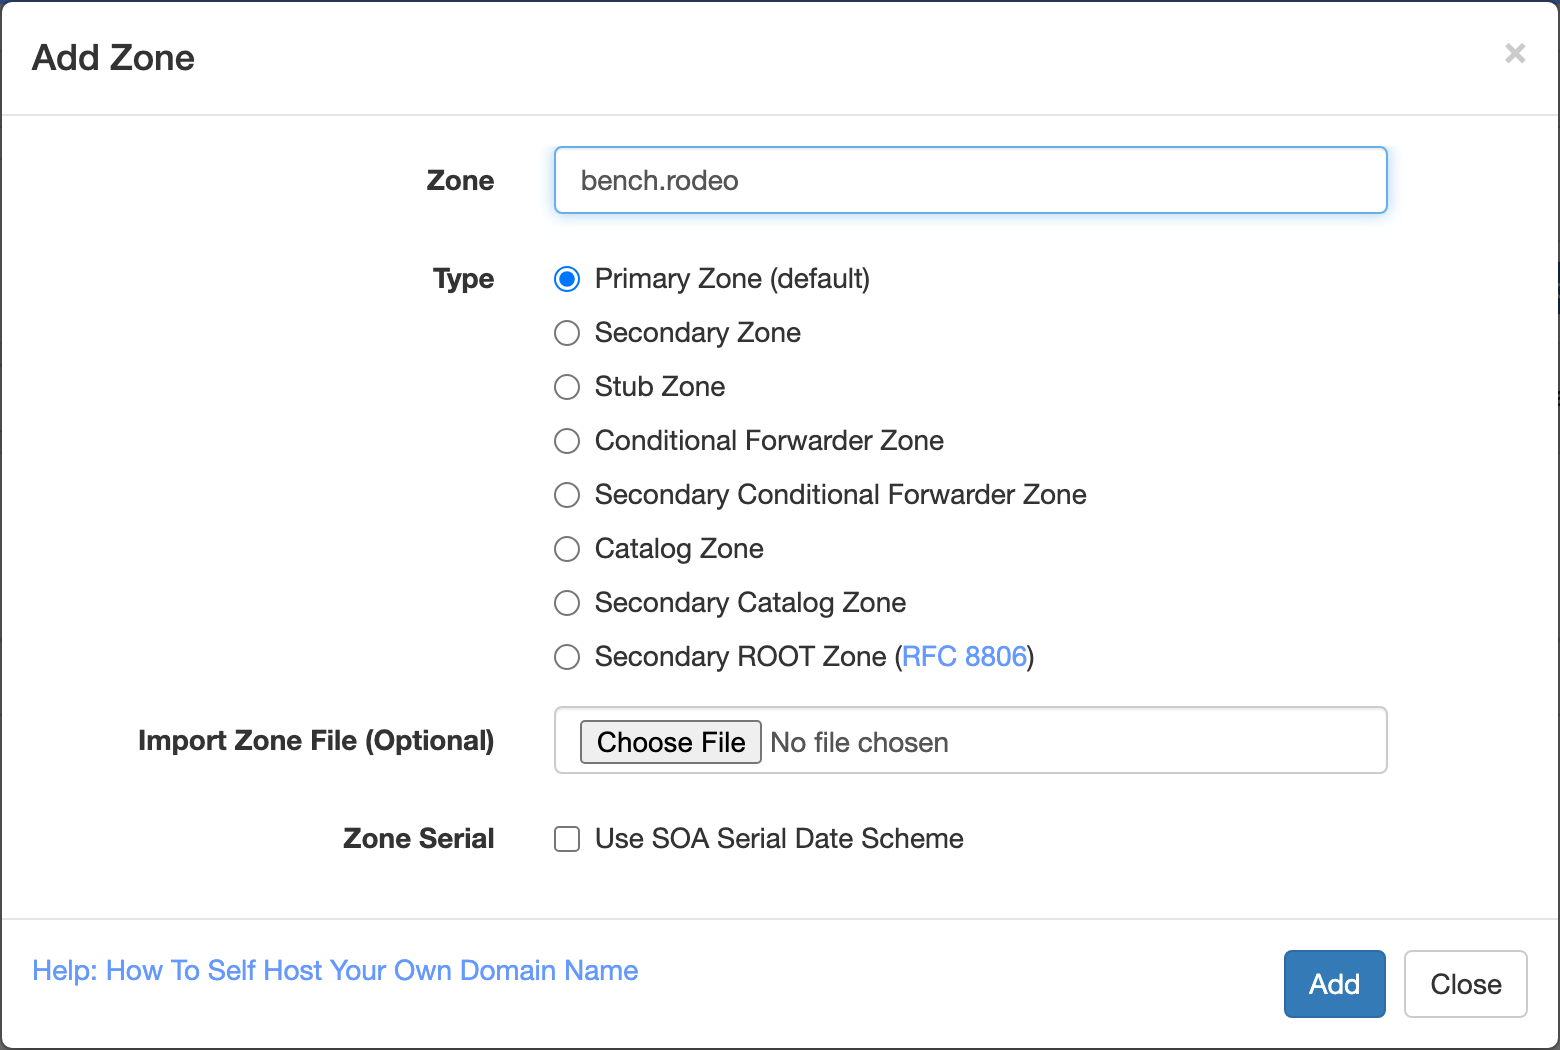
Type your domain in Zone. Leave the type on Primary Zone, which is the default. Click Add.
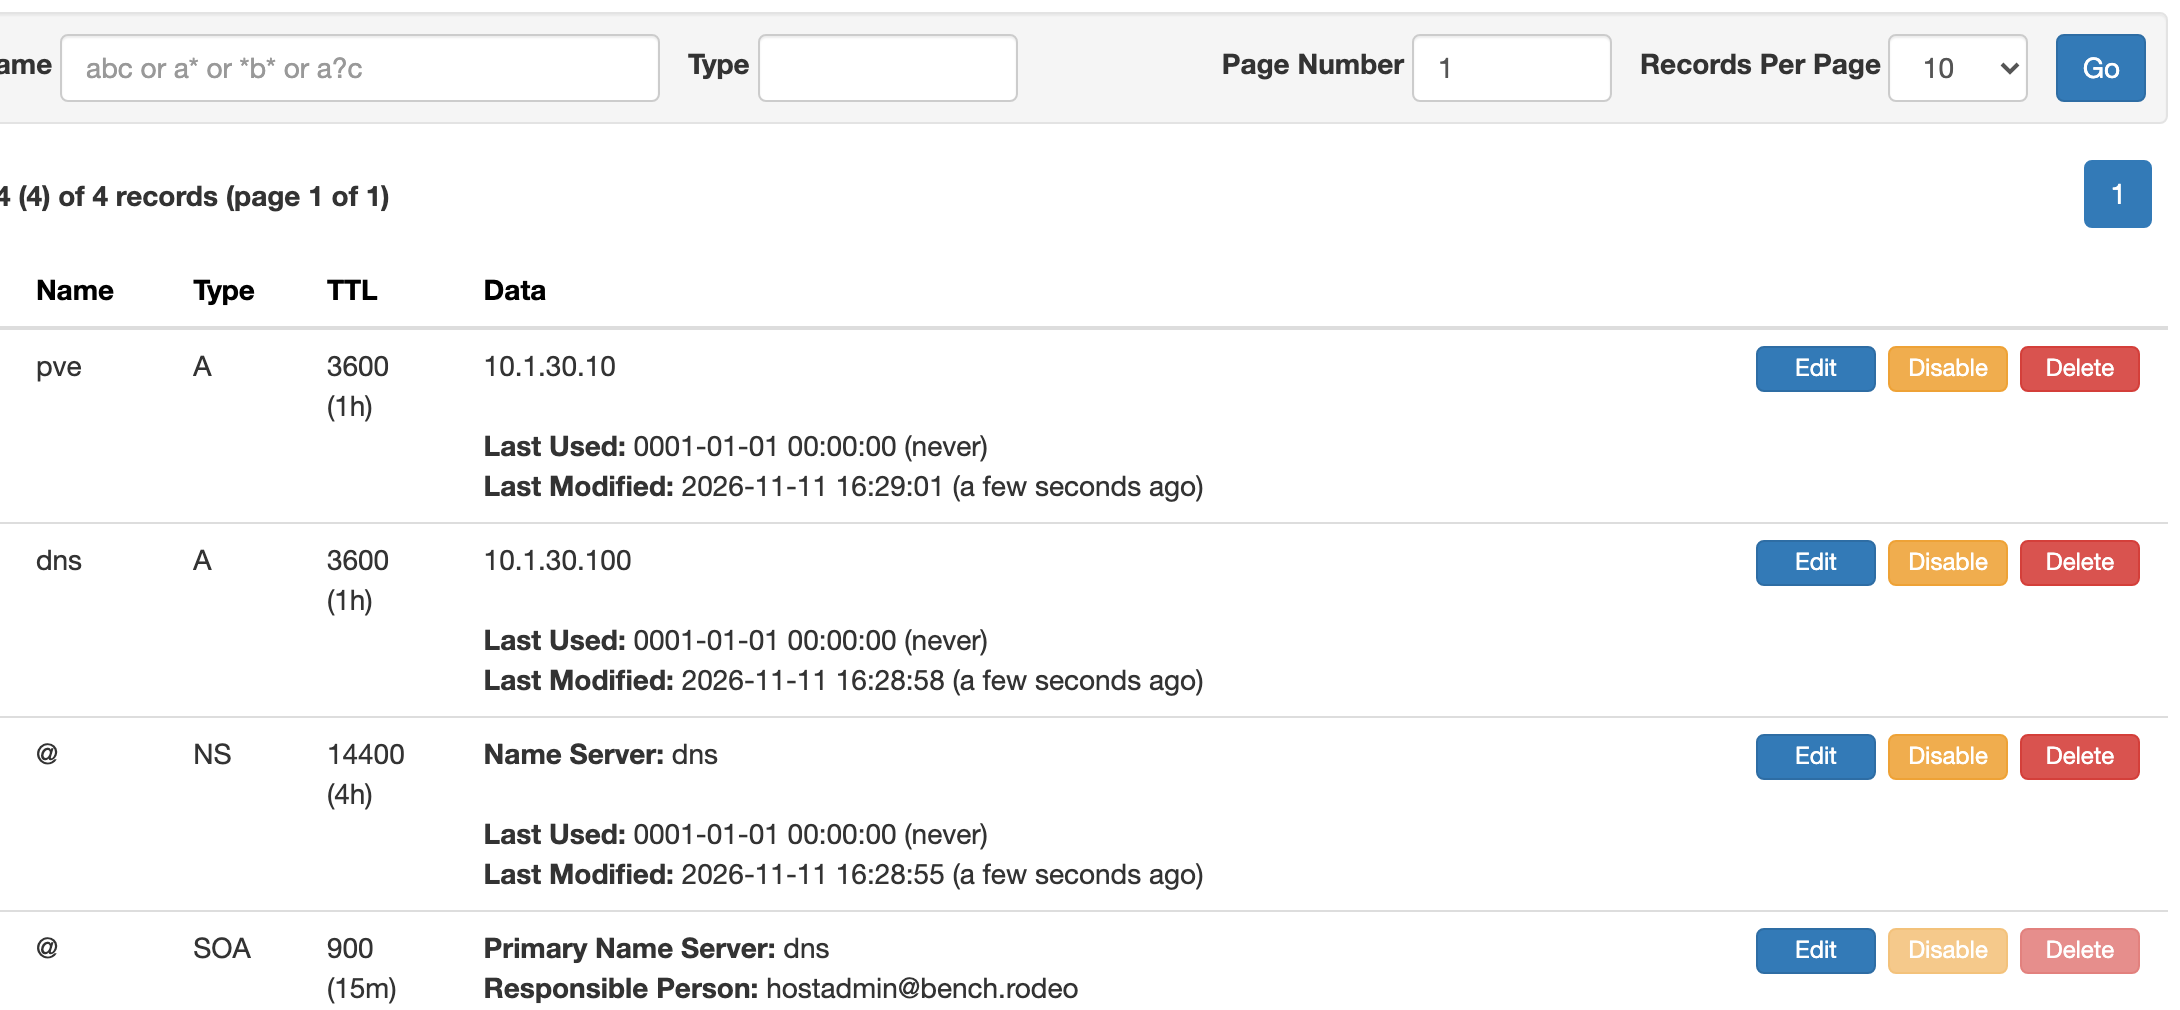
Technitium opens the new zone. It already holds two records, an NS and an SOA. Both describe the zone itself and you can leave them alone.
NOTE
A Primary zone means this server answers every question about the domain by itself. That's right for a domain you only use at home. If your domain also has a public website or email, make the zone for a part of it, such as home.example.com, and put your names under that. Otherwise your own network would stop seeing the public records.
Step 10: Add Two Records
Each record in a zone ties a name to something. The two you'll add each tie a name to an IPv4 address, and that kind of record is called an A record. Add one for the DNS server.
In the zone, click Add Record.
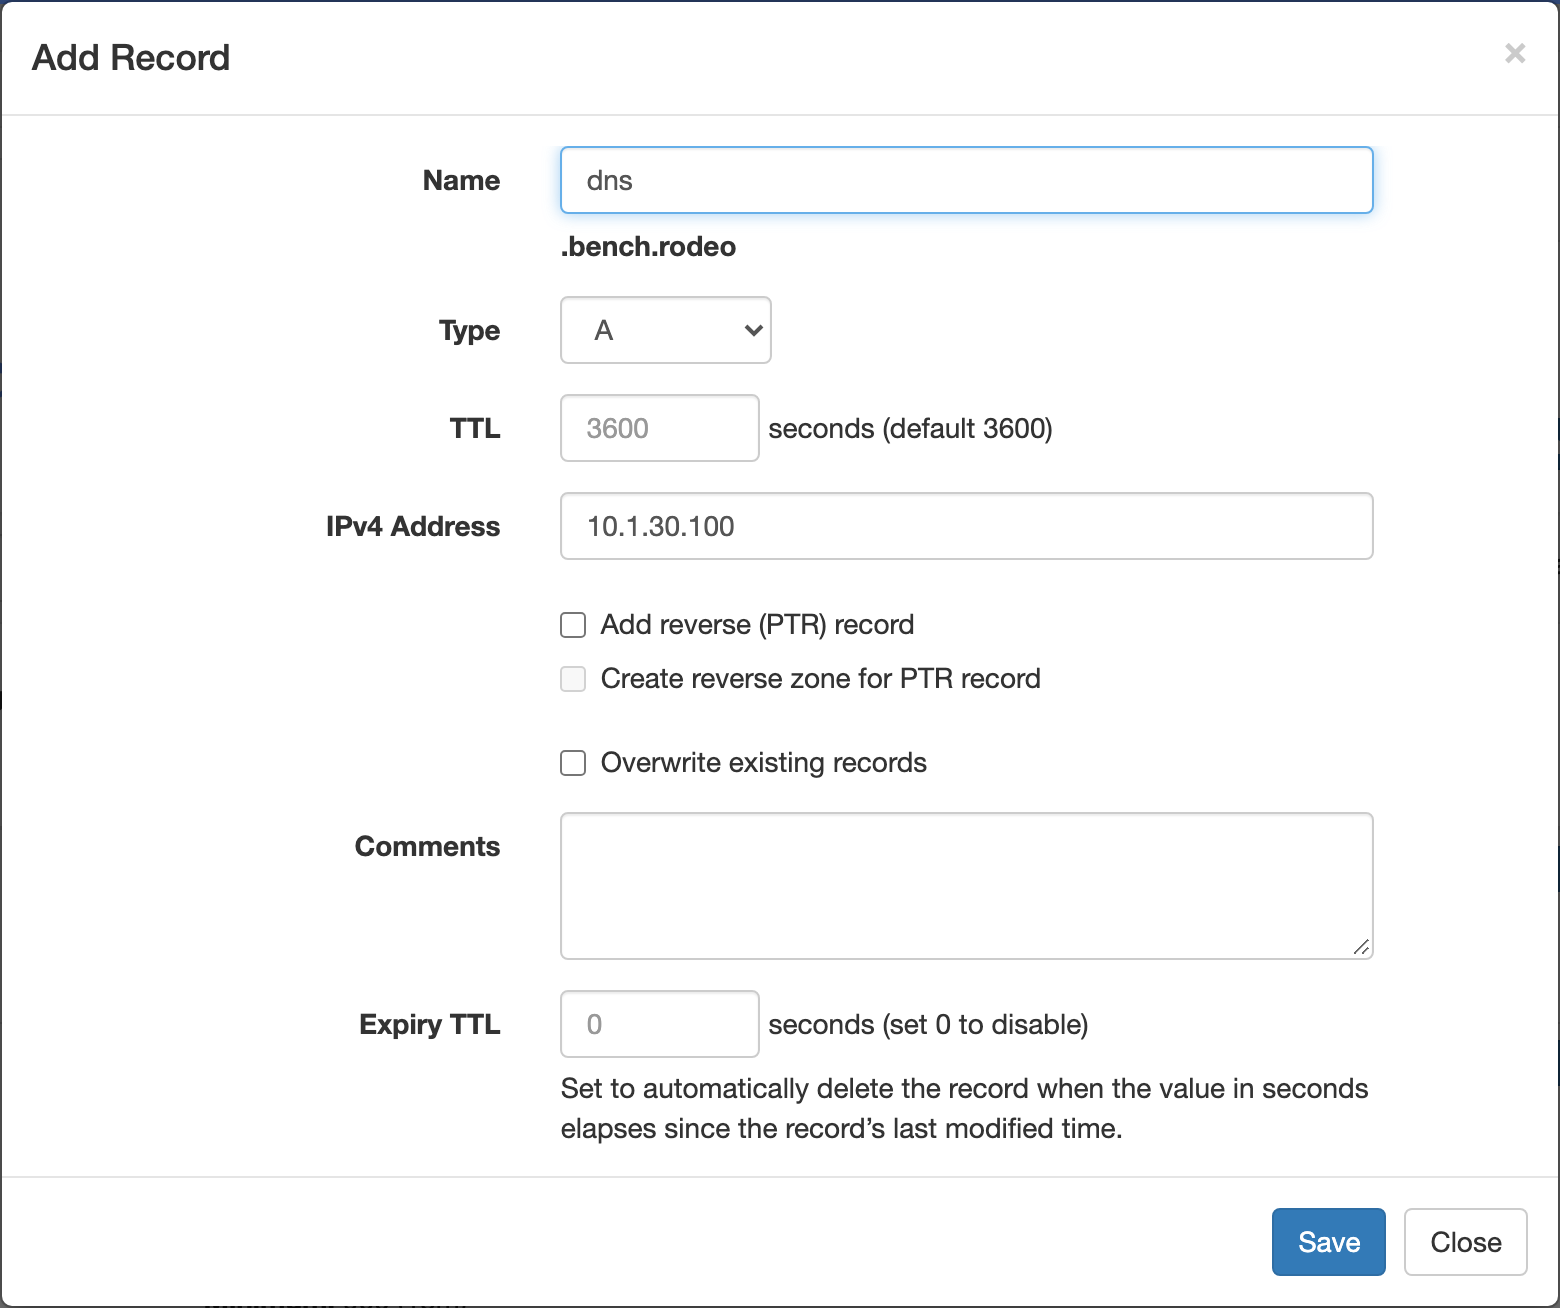
- Name:
dns - Type:
A, which is the default. An A record holds an IPv4 address. - IPv4 Address:
10.1.30.100
Leave the rest as it is and click Save.
Click Add Record again for the Proxmox host:
- Name:
pve - IPv4 Address:
10.1.30.10
Click Save. The zone now lists four records.
Step 11: Check Your Names
On the Proxmox host, ask for the first name.
dig +short @10.1.30.100 dns.bench.rodeoYou should see 10.1.30.100.
dig +short @10.1.30.100 pve.bench.rodeoYou should see 10.1.30.10.
Now ask for a name you didn't create. This time leave out +short, so dig prints its whole reply, the status line included.
dig @10.1.30.100 nothere.bench.rodeoNear the top of the output, look for status: NXDOMAIN. That's DNS for "no such name", and it came from your server alone. It didn't ask the internet, because it's in charge of this domain.
Step 12: Point a Container at It
A container uses whatever DNS server Proxmox gives it. For every container you create from here on, that's one flag on pct create: --nameserver 10.1.30.100. The later parts of this series do that. Part 3 is the first: its container is created with that flag, and you'll watch it look up a name through this server.
There's nothing to run in this step. If you already have a container you want to switch over, the same flag works on pct set, with the container's ID. A container reads its DNS setting when it starts, so restart it afterwards with pct reboot.
NOTE
Leave the Proxmox host's own DNS setting as it is. If the host depended on a container for DNS, a stopped container would leave the host unable to fetch updates, including the ones that might fix the container.
Step 13: Point Your Own Devices at It
Your phone and laptop get their DNS server from your router. To give every device on your network these names, you change one setting in the router: the DNS server it hands out.
WARNING
Once you do this, every device in the house depends on this container for DNS. If the container is stopped, nothing resolves and the internet looks down. Write down what the setting is now before you change it, so you can put it back.
The Proxmox host isn't one of those devices. It doesn't take its network settings from the router: its DNS server was set when you installed Proxmox, and stays the same whatever the router hands out. So when the container is down, the host can still reach the internet, and you can still get to it to start the container again.
Every router puts the setting somewhere different, usually under DHCP or LAN. Set the DNS server to your Technitium address, 10.1.30.100 here. If the router has a second DNS field, leave it empty. A public server in that field means devices sometimes ask it instead, and your private names fail at random.
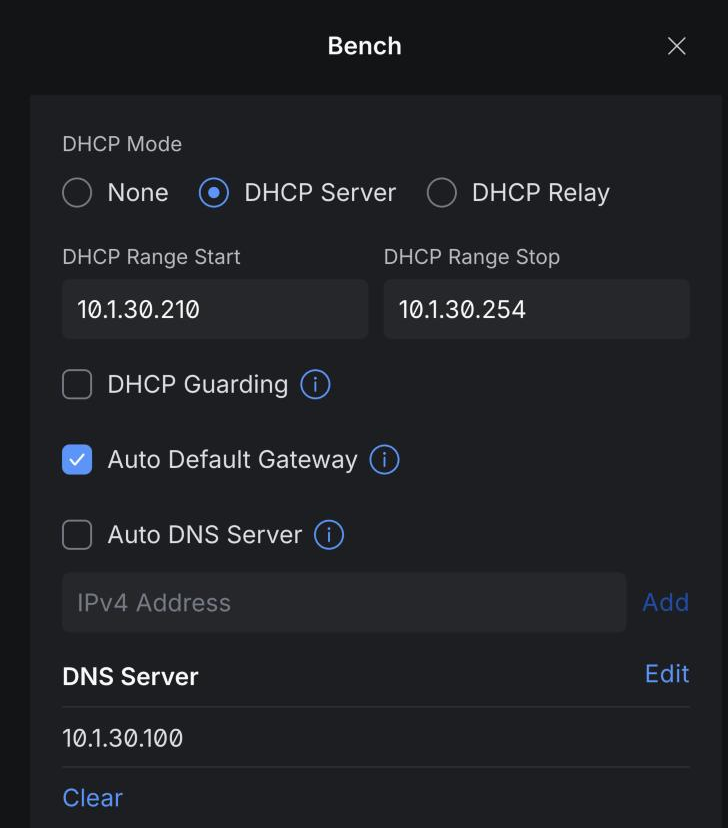
On my UniFi router it's in Settings, then Networks, then the network your devices are on. In its DHCP section, untick Auto DNS Server so the DNS boxes appear. Click Clear to remove any servers already listed, type your Technitium address and click Add, then Apply Changes.
Devices pick up the change when they next connect, so turn Wi-Fi off and on to try it. Then open http://dns.bench.rodeo:5380 in a browser, with your own domain. If Technitium's admin page appears, that device is using your DNS server.
The name still needs :5380 on the end. DNS only turns dns.bench.rodeo into the address 10.1.30.100. It says nothing about ports, so the browser still has to be told which one the admin page is on. Part 3's reverse proxy takes that over, and from then on the name alone is enough.
I haven't tested this step. Nothing on the network this guide was written on takes its settings from the router, so I filled the setting in for the screenshot and cancelled it without saving.
Next Steps
You have a DNS server that knows your domain. Its admin page is still plain HTTP, with a port on the end of its name. Part 3 fixes both: a reverse proxy that gives every service, this one included, a name of its own and a real certificate.
Technitium can also block ads and trackers for every device that uses it. That's its own guide.
If I helped you learn something, please consider buying me a coffee.
Buy me a coffee