Guide
HTTPS for Every Homelab Service with Caddy on Proxmox LXC
One wildcard certificate from Let's Encrypt for your whole domain, and Caddy in a Proxmox LXC giving each service a name with no port and a padlock. Nothing exposed to the internet.
Contents
- What You Will End Up With
- How the Pieces Fit
- One Certificate for Everything, or One per Name
- Step 1: Create the Container
- Step 2: Enter the Container and Update It
- Step 3: Check It Uses Your DNS Server
- Step 4: Install Caddy
- Step 5: Swap In a Build with Cloudflare Support
- Step 6: Give Caddy a Cloudflare Token
- Step 7: Let Caddy Check Proxmox's Certificate
- Step 8: Write the Caddyfile
- Step 9: Restart Caddy and Get the Certificate
- Step 10: Check It Before Moving Your Names
- Step 11: Point Your Names at Caddy
- Step 12: Open Them by Name
- Step 13: See What the Public Can See
- Updating Caddy
- Adding a Service Later
- Next Steps
This is part 3 of Homelab Foundations. In part 1 I bought bench.rodeo and put it on Cloudflare. In part 2 a DNS server at home started answering for it, so dns.bench.rodeo turns into a private address. But the DNS server's admin page is still plain HTTP, and its name only works with :5380 on the end.
This part fixes both, for that page and for every service after it. Caddy, a reverse proxy, sits in front of your services, answers on the normal HTTPS port, and passes each request on to the right one. It gets a real certificate from Let's Encrypt, the free certificate authority every browser trusts, so you get the padlock with no warnings.
If you're starting here, you need two things from the earlier parts: a domain whose DNS is on Cloudflare, and a DNS server at home where you can add records for it. Any DNS server works for this part. I use the Technitium server from part 2.
Nothing in this guide is reachable from the internet. Let's Encrypt checks that the domain is yours through Cloudflare's DNS, not by visiting your network, so no port is ever forwarded. Never forward 80 or 443 from your router to this container.
What You Will End Up With
- An unprivileged Debian 13 LXC running Caddy 2.11.9, built with Cloudflare support
- One wildcard certificate for
*.bench.rodeo, which covers every name one level under your domain, likedns.bench.rodeo, renewed by Caddy on its own https://dns.bench.rodeoopening the DNS server's admin page, andhttps://pve.bench.rodeoopening Proxmox, both with no port and no warning- A container that uses your own DNS server, as part 2 promised
In this guide Caddy's container has CT ID 101 and IP 10.1.30.101, the DNS server is at 10.1.30.100, the Proxmox host is at 10.1.30.10, and the domain is bench.rodeo. Substitute your own.
How the Pieces Fit
Two things happen, at different times.
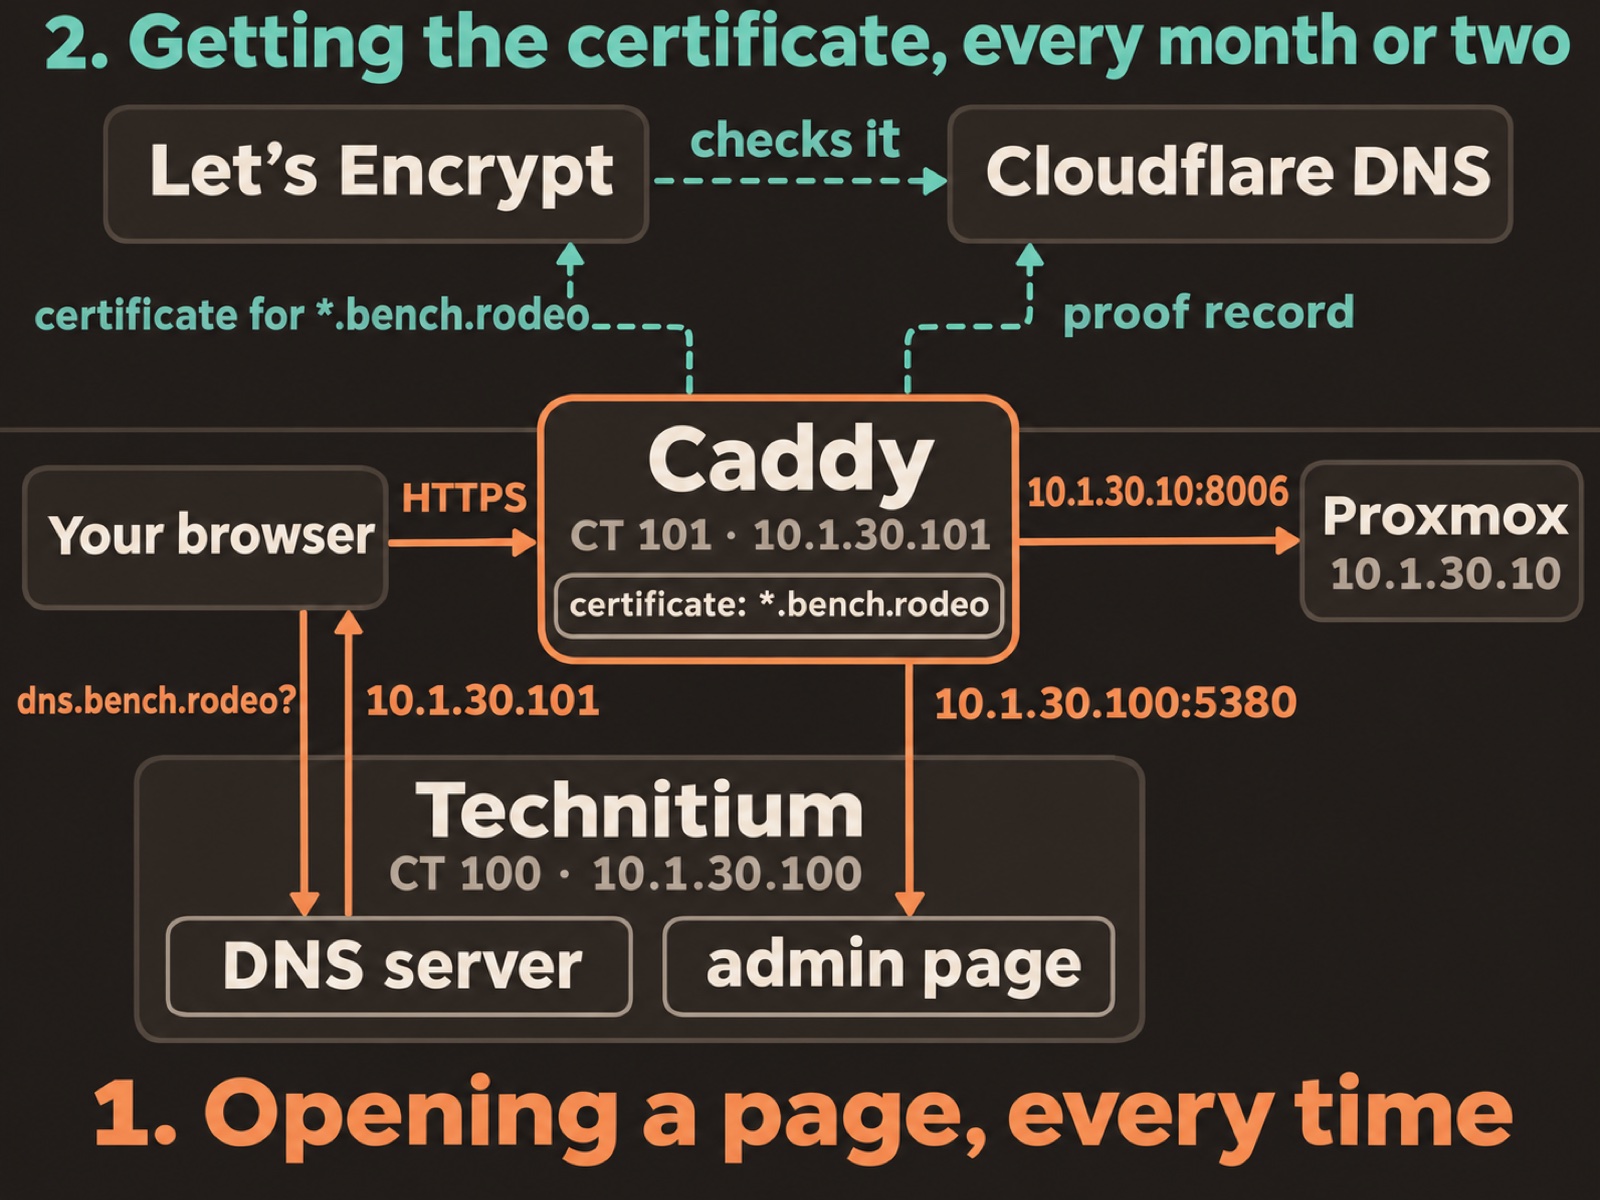
Opening a page, every time. Your browser asks your DNS server for dns.bench.rodeo and gets Caddy's address. It connects to Caddy over HTTPS, and Caddy shows the certificate. Caddy then passes the request on to the admin page at 10.1.30.100:5380 and sends the answer back.
Getting the certificate, once and then again every month or two, before it runs out. Caddy asks Let's Encrypt for a certificate for *.bench.rodeo. Let's Encrypt says: prove the domain is yours by putting this code in its DNS. Caddy puts it there through Cloudflare, Let's Encrypt reads it, and the certificate is issued. Your network is never visited.
One Certificate for Everything, or One per Name
Caddy can get a certificate for each name, dns.bench.rodeo, pve.bench.rodeo and so on, or one wildcard certificate, *.bench.rodeo, that covers them all. I use the wildcard.
Every certificate is public. Certificate authorities publish each one they issue in public logs, so anyone can look up every certificate for a domain. With one per name, that list is a list of what you run at home. With a wildcard, it shows *.bench.rodeo and nothing else.
New services need no new certificate. When a later part adds a service, it's covered the moment you add it to Caddy.
What it costs: one certificate and its key serve every name. If someone copied that key off the container, it would work for all of them, where a per-name key works for only one.
Either way, Caddy needs a Cloudflare token that can change your domain's DNS. A wildcard can only be proved through DNS, and your services can't be reached from the internet for any other kind of proof. This guide limits that token to the one domain.
If you'd rather have one certificate per name, Step 8's Caddyfile changes in two places: the wildcard block goes, and the line that names Cloudflare moves into the settings at the top as acme_dns cloudflare {env.CLOUDFLARE_API_TOKEN}. Caddy then gets one certificate for each service, still through Cloudflare. Everything else is the same.
Step 1: Create the Container
Open a terminal on your computer: Terminal on a Mac or on Linux, PowerShell on Windows. ssh is normally already there on all three. If yours says the command isn't found, install the OpenSSH client for your system first. Then connect to the Proxmox host as root, its admin user. The part after the @ is the host's address: use your own in place of mine.
ssh root@10.1.30.10It asks for the root password you chose when you installed Proxmox. Everything this guide runs "on the Proxmox host" is typed into this session.
A container starts from a template, a ready-made copy of an operating system. If you followed part 2 you already have the Debian 13 template, and the next three commands only confirm it. pveam is Proxmox's tool for templates, and update refreshes its list of the ones you can download.
pveam updateFind the current Debian 13 template. available lists every template there is, and --section system keeps it to plain operating systems. The | hands that list to grep, which prints only the lines containing debian-13.
pveam available --section system | grep debian-13You want the amd64 line. When this guide was written it was debian-13-standard_13.6-1_amd64.tar.zst. If yours is newer, use your file name in the next two commands.
Download it to local, the storage every Proxmox host has for templates. If it's already there, pveam checks the file and says there's no need to download it.
pveam download local debian-13-standard_13.6-1_amd64.tar.zstNow create the container. pct is Proxmox's tool for containers, and create makes a new one. The \ at the end of each line only means the command carries on to the next line, so all of it is one command.
pct create 101 local:vztmpl/debian-13-standard_13.6-1_amd64.tar.zst \
    --hostname proxy \
    --cores 1 \
    --memory 512 \
    --swap 512 \
    --rootfs local-lvm:4 \
    --net0 name=eth0,bridge=vmbr0,ip=10.1.30.101/24,gw=10.1.30.1 \
    --nameserver 10.1.30.100 \
    --unprivileged 1 \
    --features nesting=1 \
    --onboot 1 \
--password| Flag | What it does |
|---|---|
101 | Container ID, the first thing after pct create. Replace with a free ID on your host. |
local:vztmpl/... | The template: local is the storage, and vztmpl is where it keeps templates. Replace the file name if yours is newer. |
--hostname | The container's name. |
--cores | How many CPU cores it gets. One is plenty for a proxy at home. |
--memory | RAM in MB. Caddy uses about 50 MB. |
--swap | Swap in MB: disk space it can use as extra memory if it runs out of RAM. |
--rootfs | A 4 GB root disk on the local-lvm pool. Replace local-lvm if your storage has a different name. |
--net0 | Network. name is the network card's name inside the container, bridge is the Proxmox bridge it plugs into, ip is its address, with /24 saying the network is every address that shares the first three numbers, and gw is your router. Replace bridge, ip and gw with your own. Every name you give a service will point here, so the address must never change. |
--nameserver | The DNS server this container uses for its lookups. This is your DNS server from part 2, so the container can look up your own names. Replace with your DNS server's address. |
--unprivileged | 1 means yes. Root inside an unprivileged container has no special rights on the host. Keep it: it's the safer default. |
--features | nesting=1 lets systemd inside the container manage its own services. |
--onboot | 1 starts the container when the host boots, so your names come back by themselves after a restart. |
--password | Asks you for a root password for the container. |
You'll be asked for a root password twice. It's finished when your prompt comes back.
Start the container:
pct start 101It prints nothing when it works.
Step 2: Enter the Container and Update It
From here until Step 7, everything happens inside the container.
On the Proxmox host, open a shell inside CT 101:
pct enter 101Your prompt should now say root@proxy. apt is Debian's tool for installing software, and update refreshes its list of what's available.
apt updateIf the last line is a Notice that Debian's version changed, say from 13.6 to 13.7, that's fine. The template is a little older than Debian's newest release, and you'll install the updates in a moment.
The Debian 13 template ships with no locales generated, but the shell inherits LANG=en_US.UTF-8 from the host. That mismatch makes apt print Setting locale failed warnings on every command. Generating en_US.UTF-8 once stops them, and it takes three commands.
Install the package that builds locales. install installs it, and -y answers yes when apt asks whether to go ahead, so it doesn't stop and wait for you.
apt install -y localesThat package keeps a list of every locale it can build, in /etc/locale.gen, with each line switched off by a # in front. Remove the # from the en_US.UTF-8 line. sed edits text, and here it makes that one change in the file.
sed -i 's/^# en_US.UTF-8 UTF-8/en_US.UTF-8 UTF-8/' /etc/locale.gen| Part | What it does |
|---|---|
-i | Changes the file itself. Without it, sed only prints the changed text. |
s/.../.../ | Swaps the text between the first two slashes for the text between the last two: the line with # in front becomes the same line without it. |
^ | Matches only at the start of a line, so the line has to begin with # en_US. |
'...' | The single quotes pass the whole change to sed exactly as written, spaces and all. |
/etc/locale.gen | The file to change. |
Build every locale that's now switched on.
locale-genYou should see en_US.UTF-8... done.
Now upgrade any packages that have moved since the template was built. upgrade installs the newer versions.
apt upgrade -yStep 3: Check It Uses Your DNS Server
Part 2 promised this: a container created with --nameserver looks names up through your own DNS server. Check what Proxmox set. cat prints a file, and /etc/resolv.conf is where Linux keeps the DNS server it asks.
cat /etc/resolv.confYou should see nameserver 10.1.30.100, your DNS server.
Now look up one of your own names the way any program in the container would. getent hosts asks the system to turn a name into an address, using that DNS server.
getent hosts pve.bench.rodeoYou should see 10.1.30.10 next to the name. Nothing on the internet knows that name, so the answer can only have come from your server.
Step 4: Install Caddy
Caddy publishes its own Debian package, which brings the program, a caddy user for it to run as, and a service that starts it. It comes from Caddy's own package feed, which needs two tools first. curl downloads files from the web, and gpg handles the signing key that proves packages from the feed are Caddy's.
apt install -y curl gpgDownload Caddy's signing key and save it where apt looks for keys.
curl -fsSL https://dl.cloudsmith.io/public/caddy/stable/gpg.key | gpg --dearmor -o /usr/share/keyrings/caddy-stable-archive-keyring.gpg| Part | What it does |
|---|---|
-f | If the server answers with an error, curl fails instead of passing the error page on. |
-s | Silent: no progress bar. |
-S | Still shows an error if one happens, which -s would otherwise hide. |
-L | Follows the address if the server says the file has moved. |
| | Hands what curl downloaded straight to gpg, instead of printing it. |
gpg --dearmor | Turns the key from text into the binary form apt reads. |
-o ... | Where gpg writes it. /usr/share/keyrings is where keys for extra feeds go. |
Download the line that tells apt where Caddy's feed is, and save it where apt keeps its list of feeds. tee writes what it's given to the file named after it, and prints it as well, so you see what was saved.
curl -fsSL https://dl.cloudsmith.io/public/caddy/stable/debian.deb.txt | tee /etc/apt/sources.list.d/caddy-stable.listYou'll see a few lines starting with #, which are comments, then two starting deb and deb-src. Each names the key from the last command, which is how apt knows to check this feed's packages against it.
Refresh the package lists so apt sees the new feed, then install Caddy.
apt updateapt install -y caddyCaddy starts straight away, serving a placeholder page. caddy version prints the version you got.
caddy versionWhen this guide was written it printed v2.11.9, followed by a long checksum.
Step 5: Swap In a Build with Cloudflare Support
Caddy's package can't talk to Cloudflare. That takes a plugin, and Caddy plugins are built into the program itself. You don't need to build it: Caddy's website builds a copy with the plugin you name and hands it over.
cd changes the directory you're working in. Go to /tmp, so the download lands somewhere that gets cleaned up.
cd /tmpDownload Caddy with the Cloudflare plugin. It's about 50 MB, and it can take a minute, because it's built when you ask.
curl -fsSL -o caddy "https://caddyserver.com/api/download?os=linux&arch=amd64&p=github.com/caddy-dns/cloudflare"| Part | What it does |
|---|---|
-fsSL | The same four curl flags as in Step 4, written together. |
-o caddy | Saves the download as a file named caddy in this directory. |
"https://..." | The address of Caddy's download page. os=linux and arch=amd64 ask for a build for this container, and p=github.com/caddy-dns/cloudflare names the plugin to build in. The double quotes stop the shell reading the & characters as its own. |
You always get the newest Caddy this way: the page ignores any version you ask for. The guide was tested with 2.11.9.
A downloaded file isn't allowed to run until you say so. chmod changes a file's permissions, and +x lets it run.
chmod +x caddyCheck it has the plugin before you install it. ./caddy runs the file in this directory, list-modules lists everything built into it, and grep cloudflare picks out the line you want.
./caddy list-modules | grep cloudflareYou should see dns.providers.cloudflare.
Now put it in place of the package's copy, so the package's service runs it. Caddy's documentation gives a way that keeps Debian's package system from putting the old copy back on the next upgrade. It's four commands.
First move the package's copy aside. dpkg-divert tells Debian's package system that a file of a package now lives somewhere else.
dpkg-divert --divert /usr/bin/caddy.default --rename /usr/bin/caddy| Part | What it does |
|---|---|
--divert /usr/bin/caddy.default | Where the package's copy goes, and where future upgrades of the package will put theirs. |
--rename | Moves the file that's there now, as well as recording the change. |
/usr/bin/caddy | The file being moved aside. |
You should see Adding 'local diversion of /usr/bin/caddy to /usr/bin/caddy.default'.
Move your download in beside it. mv moves a file from the first path to the second.
mv caddy /usr/bin/caddy.custom/usr/bin/caddy is now empty. update-alternatives fills it with a link to one of several versions of a program, choosing the one with the highest number. Register the package's copy at 10.
update-alternatives --install /usr/bin/caddy caddy /usr/bin/caddy.default 10| Part | What it does |
|---|---|
--install | Adds a version to choose from. |
/usr/bin/caddy | The path the link lives at, which is what every command and the service run. |
caddy | The name of this set of versions. |
/usr/bin/caddy.default | The version being added. |
10 | Its priority. The highest wins. |
Register your build at 50, so it wins.
update-alternatives --install /usr/bin/caddy caddy /usr/bin/caddy.custom 50You should see using /usr/bin/caddy.custom to provide /usr/bin/caddy (caddy) in auto mode. Check that the caddy command is now the one with the plugin.
caddy list-modules | grep cloudflareYou should see dns.providers.cloudflare again. The service is still running the old copy. It'll pick up the new one when it restarts in Step 9.
Step 6: Give Caddy a Cloudflare Token
To put Let's Encrypt's code in your DNS, Caddy signs in to Cloudflare with a token. A token is a password for a program, and you choose exactly what it's allowed to do. This one can change DNS records for one domain and nothing else.
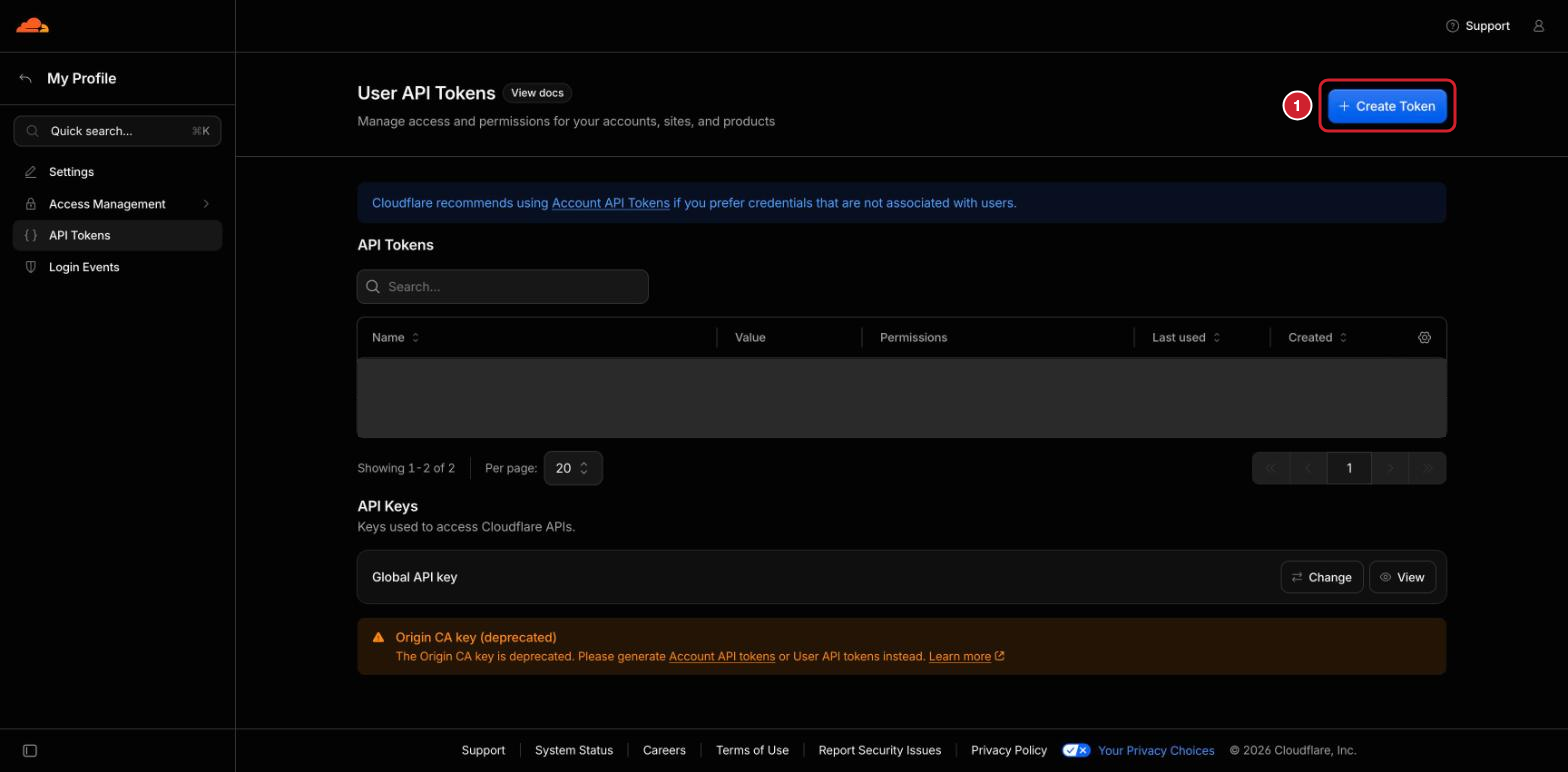
In Cloudflare's dashboard, click the person icon at the top right, then Profile, then API Tokens. Click Create Token.
Give it a name you'll recognise, such as caddy-dns. Under Policies, pick the Edit zone DNS template.
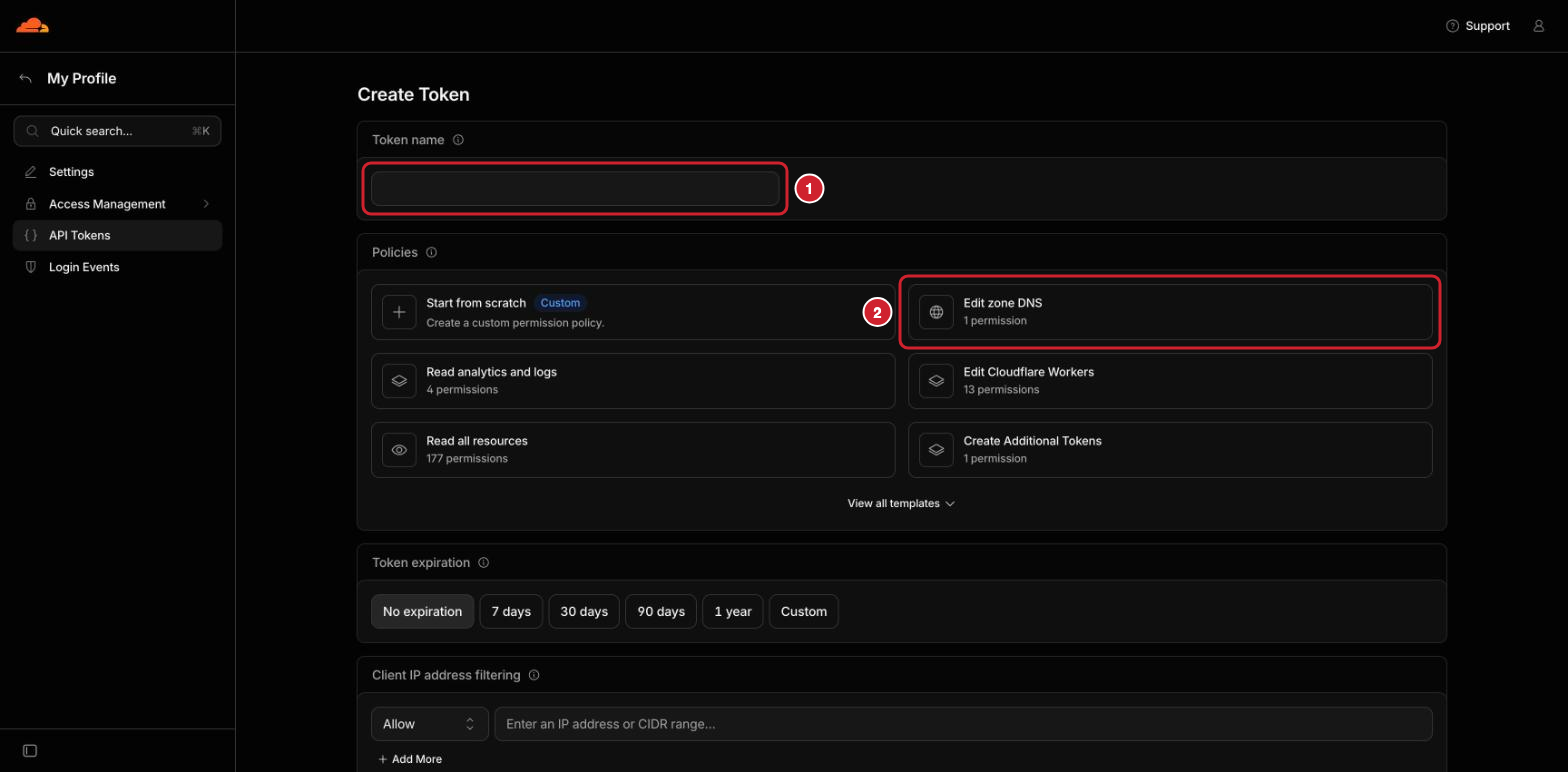
The template adds a zone policy with DNS Write. Click its pencil to edit it.
- Leave Include and Specific zone, and pick your domain from the list.
- Open DNS & Zones. DNS already has Edit ticked. Also tick Read on the Zone line. Caddy's Cloudflare plugin needs both: it reads the zone to find it, and edits its DNS to add the code.
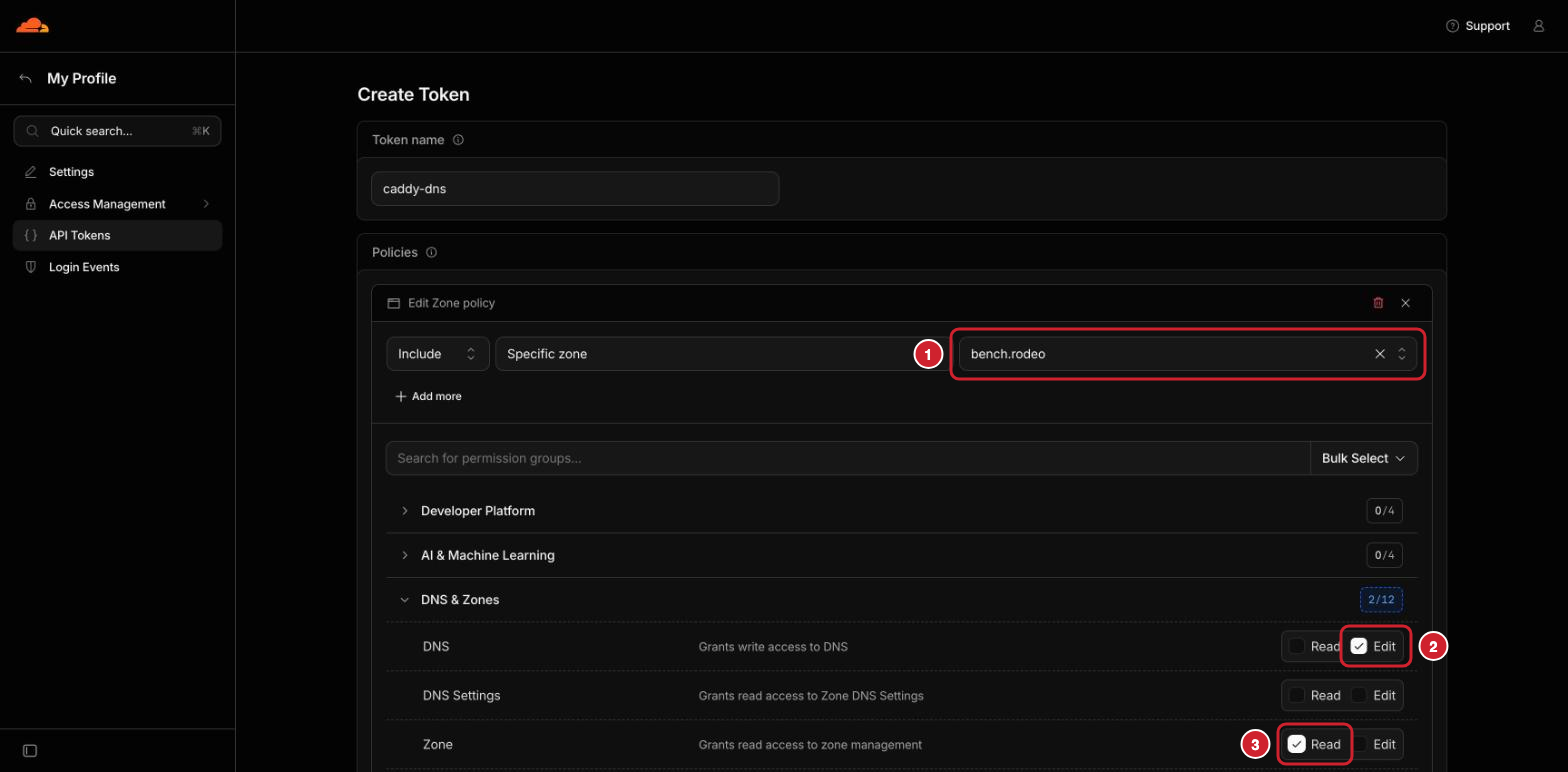
Scroll down and click Continue to summary. Check it says your domain, DNS: Edit and Zone: Read, and nothing else.
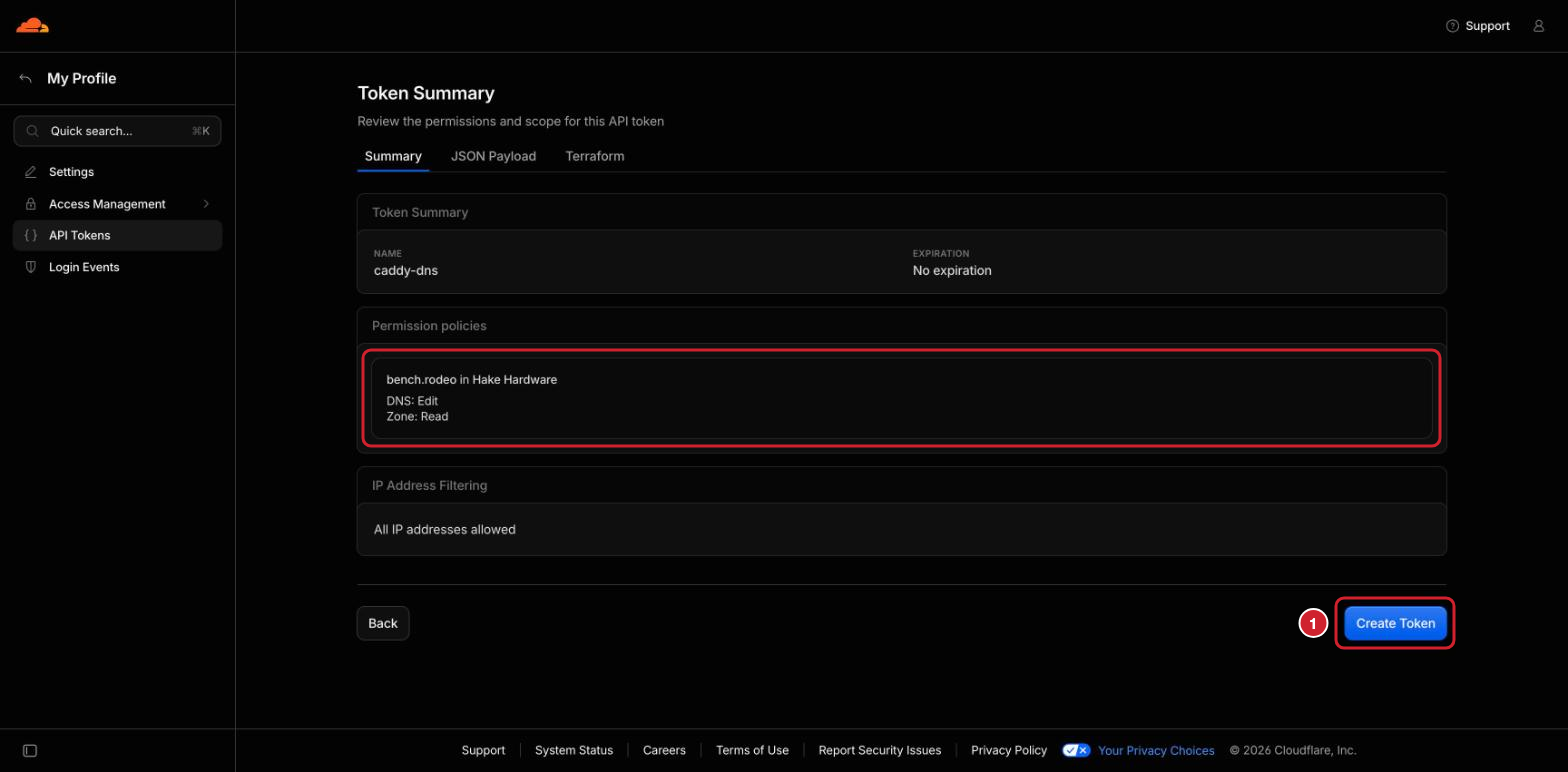
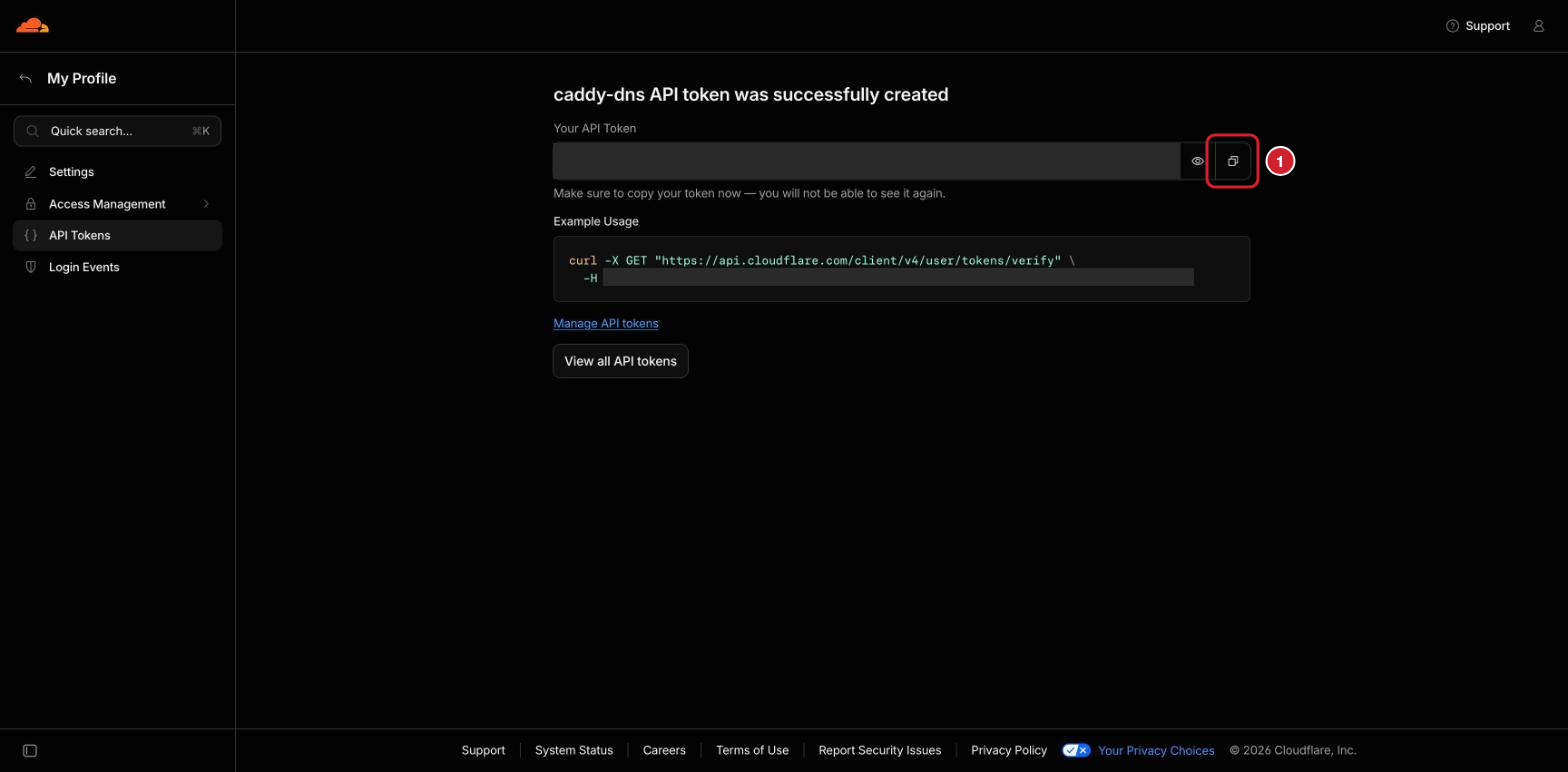
Click Create Token. Cloudflare shows the token once. Click the copy button beside it.
WARNING
Anyone with this token can change your domain's DNS. Don't paste it anywhere but the file below, and don't share a screenshot of it. If it ever leaks, delete it on the same Cloudflare page and make a new one.
Back in the container, make an empty file for the token before anything is written in it. touch creates an empty file.
touch /etc/caddy/cloudflare.envLock it down. 600 means its owner, root, can read and write it, and nobody else can do anything with it.
chmod 600 /etc/caddy/cloudflare.envOpen it in nano, a simple text editor.
nano /etc/caddy/cloudflare.envType this line, with your token pasted in place of REPLACE_ME_CLOUDFLARE_TOKEN, then save with Ctrl+X, Y, Enter.
CLOUDFLARE_API_TOKEN=REPLACE_ME_CLOUDFLARE_TOKENNow tell the service to load that file. The service's own settings came with the package, so your changes go in a separate file beside them, which an upgrade never touches. Make the directory for it. mkdir makes a directory, and -p makes any missing ones above it too.
mkdir -p /etc/systemd/system/caddy.service.dnano /etc/systemd/system/caddy.service.d/override.confPaste the following, then save with Ctrl+X, Y, Enter.
[Service]
EnvironmentFile=/etc/caddy/cloudflare.env
ExecStart=
ExecStart=/usr/bin/caddy run --config /etc/caddy/Caddyfile| Line | What it does |
|---|---|
[Service] | These settings change how the service runs. |
EnvironmentFile= | Reads the token file and hands its line to Caddy as a setting, named as in the file. systemd reads it as root, before Caddy starts, so Caddy's own user never needs to read the file. |
ExecStart= with nothing after it | Clears the command the package gave. |
The second ExecStart= | The command to run in its place. run starts Caddy and keeps it running, and --config names its settings file. |
Why replace the command at all? The package's version has one more flag, --environ, which makes Caddy print every setting it was handed into its log when it starts. The token would be one of them, in plain text, in a log anyone with access to the container can read. This is the same command without it.
Tell systemd to read its settings again. systemctl is how you give systemd commands, and daemon-reload makes it read its service files.
systemctl daemon-reloadStep 7: Let Caddy Check Proxmox's Certificate
Proxmox already serves its page over HTTPS, on port 8006, with a certificate it made for itself when you installed it. Your browser warns about that certificate because it doesn't know who signed it. Caddy would refuse it for the same reason.
You could tell Caddy not to check. Instead, give it Proxmox's own certificate authority, the one that signed that certificate, so Caddy checks the connection properly. The file is on the Proxmox host, so leave the container for a moment.
exitOn the Proxmox host, copy the file into the container. pct push copies a file from the host into a container.
pct push 101 /etc/pve/pve-root-ca.pem /etc/caddy/pve-root-ca.pem --perms 644| Part | What it does |
|---|---|
101 | The container to copy into. Replace with your container's ID. |
/etc/pve/pve-root-ca.pem | Proxmox's certificate authority on the host. It's a certificate, not a key, so it's safe to copy. |
/etc/caddy/pve-root-ca.pem | Where it goes inside the container. |
--perms 644 | Lets everyone read it, including the caddy user. Only root can change it. |
It prints nothing. Go back in.
pct enter 101Step 8: Write the Caddyfile
The Caddyfile is Caddy's settings file. The package put a placeholder there. Open it:
nano /etc/caddy/CaddyfileDelete everything in it by holding Ctrl+K until it's empty, paste the following, then save with Ctrl+X, Y, Enter. Change bench.rodeo and the three addresses to yours.
{
	tls_resolvers 1.1.1.1 1.0.0.1
}

*.bench.rodeo {
	tls {
		dns cloudflare {env.CLOUDFLARE_API_TOKEN}
	}
	abort
}

dns.bench.rodeo {
	reverse_proxy 10.1.30.100:5380
}

pve.bench.rodeo {
	reverse_proxy https://10.1.30.10:8006 {
		transport http {
			tls_trust_pool file /etc/caddy/pve-root-ca.pem
		}
	}
}
Each block starts with what it's for and holds its settings between { and }.
| Part | What it does |
|---|---|
The first { ... } | Settings for Caddy as a whole. |
tls_resolvers | Caddy checks the code has reached Cloudflare's DNS before it tells Let's Encrypt to look. This makes it ask Cloudflare's public DNS servers, 1.1.1.1 and 1.0.0.1, when it checks, instead of your own. |
*.bench.rodeo | The wildcard block. Its name is what Caddy gets a certificate for. |
tls { dns cloudflare ... } | Proves the domain through Cloudflare's DNS, which is the only way to get a wildcard. |
{env...} | The token, read from the setting the service loads from cloudflare.env in Step 6. The token itself is never in this file. |
abort | Any name under your domain that has no block of its own gets its connection closed. |
dns.bench.rodeo | A block for one name. Caddy uses the wildcard certificate for it and asks for no certificate of its own. |
reverse_proxy in the dns block | Passes every request on to the DNS server's admin page, at 10.1.30.100:5380. Plain HTTP is fine for this hop: it stays on your network, between two of your machines. |
reverse_proxy in the pve block | Passes requests on to Proxmox at 10.1.30.10:8006, over HTTPS, since that's all Proxmox's page speaks. |
transport http { ... } | Settings for how Caddy talks to Proxmox. |
tls_trust_pool file ... | Trust certificates signed by Proxmox's authority, from Step 7. |
Why tls_resolvers matters here. Without it, Caddy checks with the DNS server the container uses, your own one. That server answers for bench.rodeo itself, so it never sees the code in Cloudflare's DNS, and the certificate never comes. I tried it without the line: Caddy asked my server who's in charge of bench.rodeo, my server named itself, and the check failed and kept retrying.
Check the file before you use it. caddy validate reads the settings and reports any mistake, and --envfile hands it the token the same way the service will. Without that, it complains the token is empty.
caddy validate --config /etc/caddy/Caddyfile --envfile /etc/caddy/cloudflare.envThe last line should say Valid configuration.
Step 9: Restart Caddy and Get the Certificate
Restart Caddy, so it runs your Cloudflare build with the new settings and the token.
systemctl restart caddyIt asks for the certificate straight away. It usually takes under a minute. Give it that long, then look in its log. journalctl shows a service's log, -u caddy picks Caddy's, --no-pager prints it all at once, and grep keeps the lines about certificates.
journalctl -u caddy --no-pager | grep "certificate obtained"You should see a line with certificate obtained successfully and "identifier":"*.bench.rodeo". If you see nothing, wait another minute and run it again. If it still doesn't come, run the same command with error in place of "certificate obtained". A message about the token means it's wrong in cloudflare.env, or is missing one of the two permissions.
Leave the container.
exitStep 10: Check It Before Moving Your Names
Your names still point at the services themselves, so nothing reaches Caddy yet. Check Caddy first, so a mistake here never takes your names with it.
On the Proxmox host, ask Caddy for the DNS server's admin page, telling curl where to find the name, since the host doesn't use your DNS server.
curl -sS -o /dev/null -w "%{http_code}\n" --resolve dns.bench.rodeo:443:10.1.30.101 https://dns.bench.rodeo| Part | What it does |
|---|---|
-sS | Hides the progress bar, but still shows an error if there is one. |
-o /dev/null | Throws the page away, since you only want to know it came back. |
-w "%{http_code}\n" | Prints the reply's status code instead. 200 means the page came back fine. |
--resolve | For this one command, says where to find a name. What follows is the name, the port and the address, joined by colons: dns.bench.rodeo on port 443, the HTTPS port, is at 10.1.30.101. Nothing else changes. |
| The address at the end | The page to ask for. |
It should print 200. curl checks the certificate the way a browser does, so 200 also means the certificate is real and matches the name.
curl -sS -o /dev/null -w "%{http_code}\n" --resolve pve.bench.rodeo:443:10.1.30.101 https://pve.bench.rodeo200 again, which also means Caddy accepted Proxmox's certificate.
Try a name you have no block for:
curl -sS -o /dev/null -w "%{http_code}\n" --resolve nothere.bench.rodeo:443:10.1.30.101 https://nothere.bench.rodeoThis one should print 000 and an error from curl, because no page came back. That's the abort in the wildcard block closing the connection.
Step 11: Point Your Names at Caddy
Now change the two names from part 2 so they lead to Caddy. Open your DNS server's admin page by its address, http://10.1.30.100:5380, since you're about to move its name. Click Zones, then your domain.
Click Edit on the dns record. Change IPv4 Address to Caddy's, 10.1.30.101, and click Save.
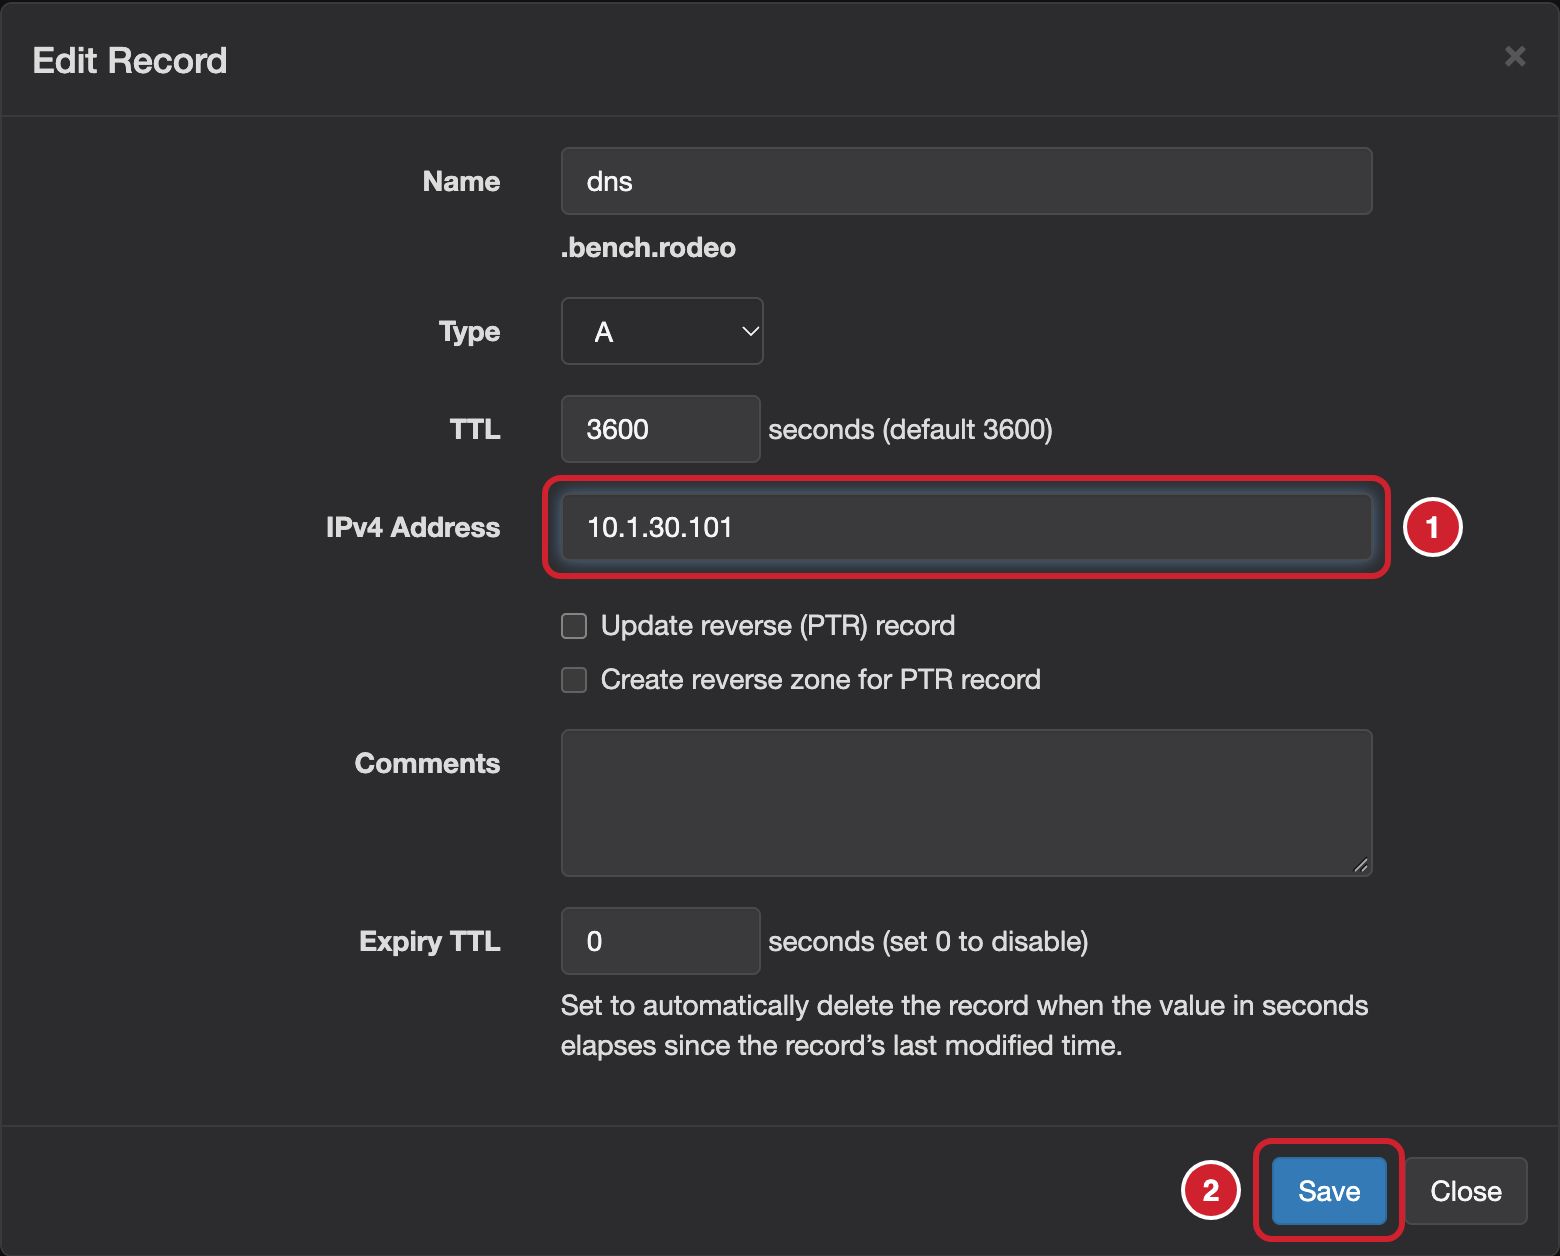
Do the same for pve. The zone should now show both names at 10.1.30.101.
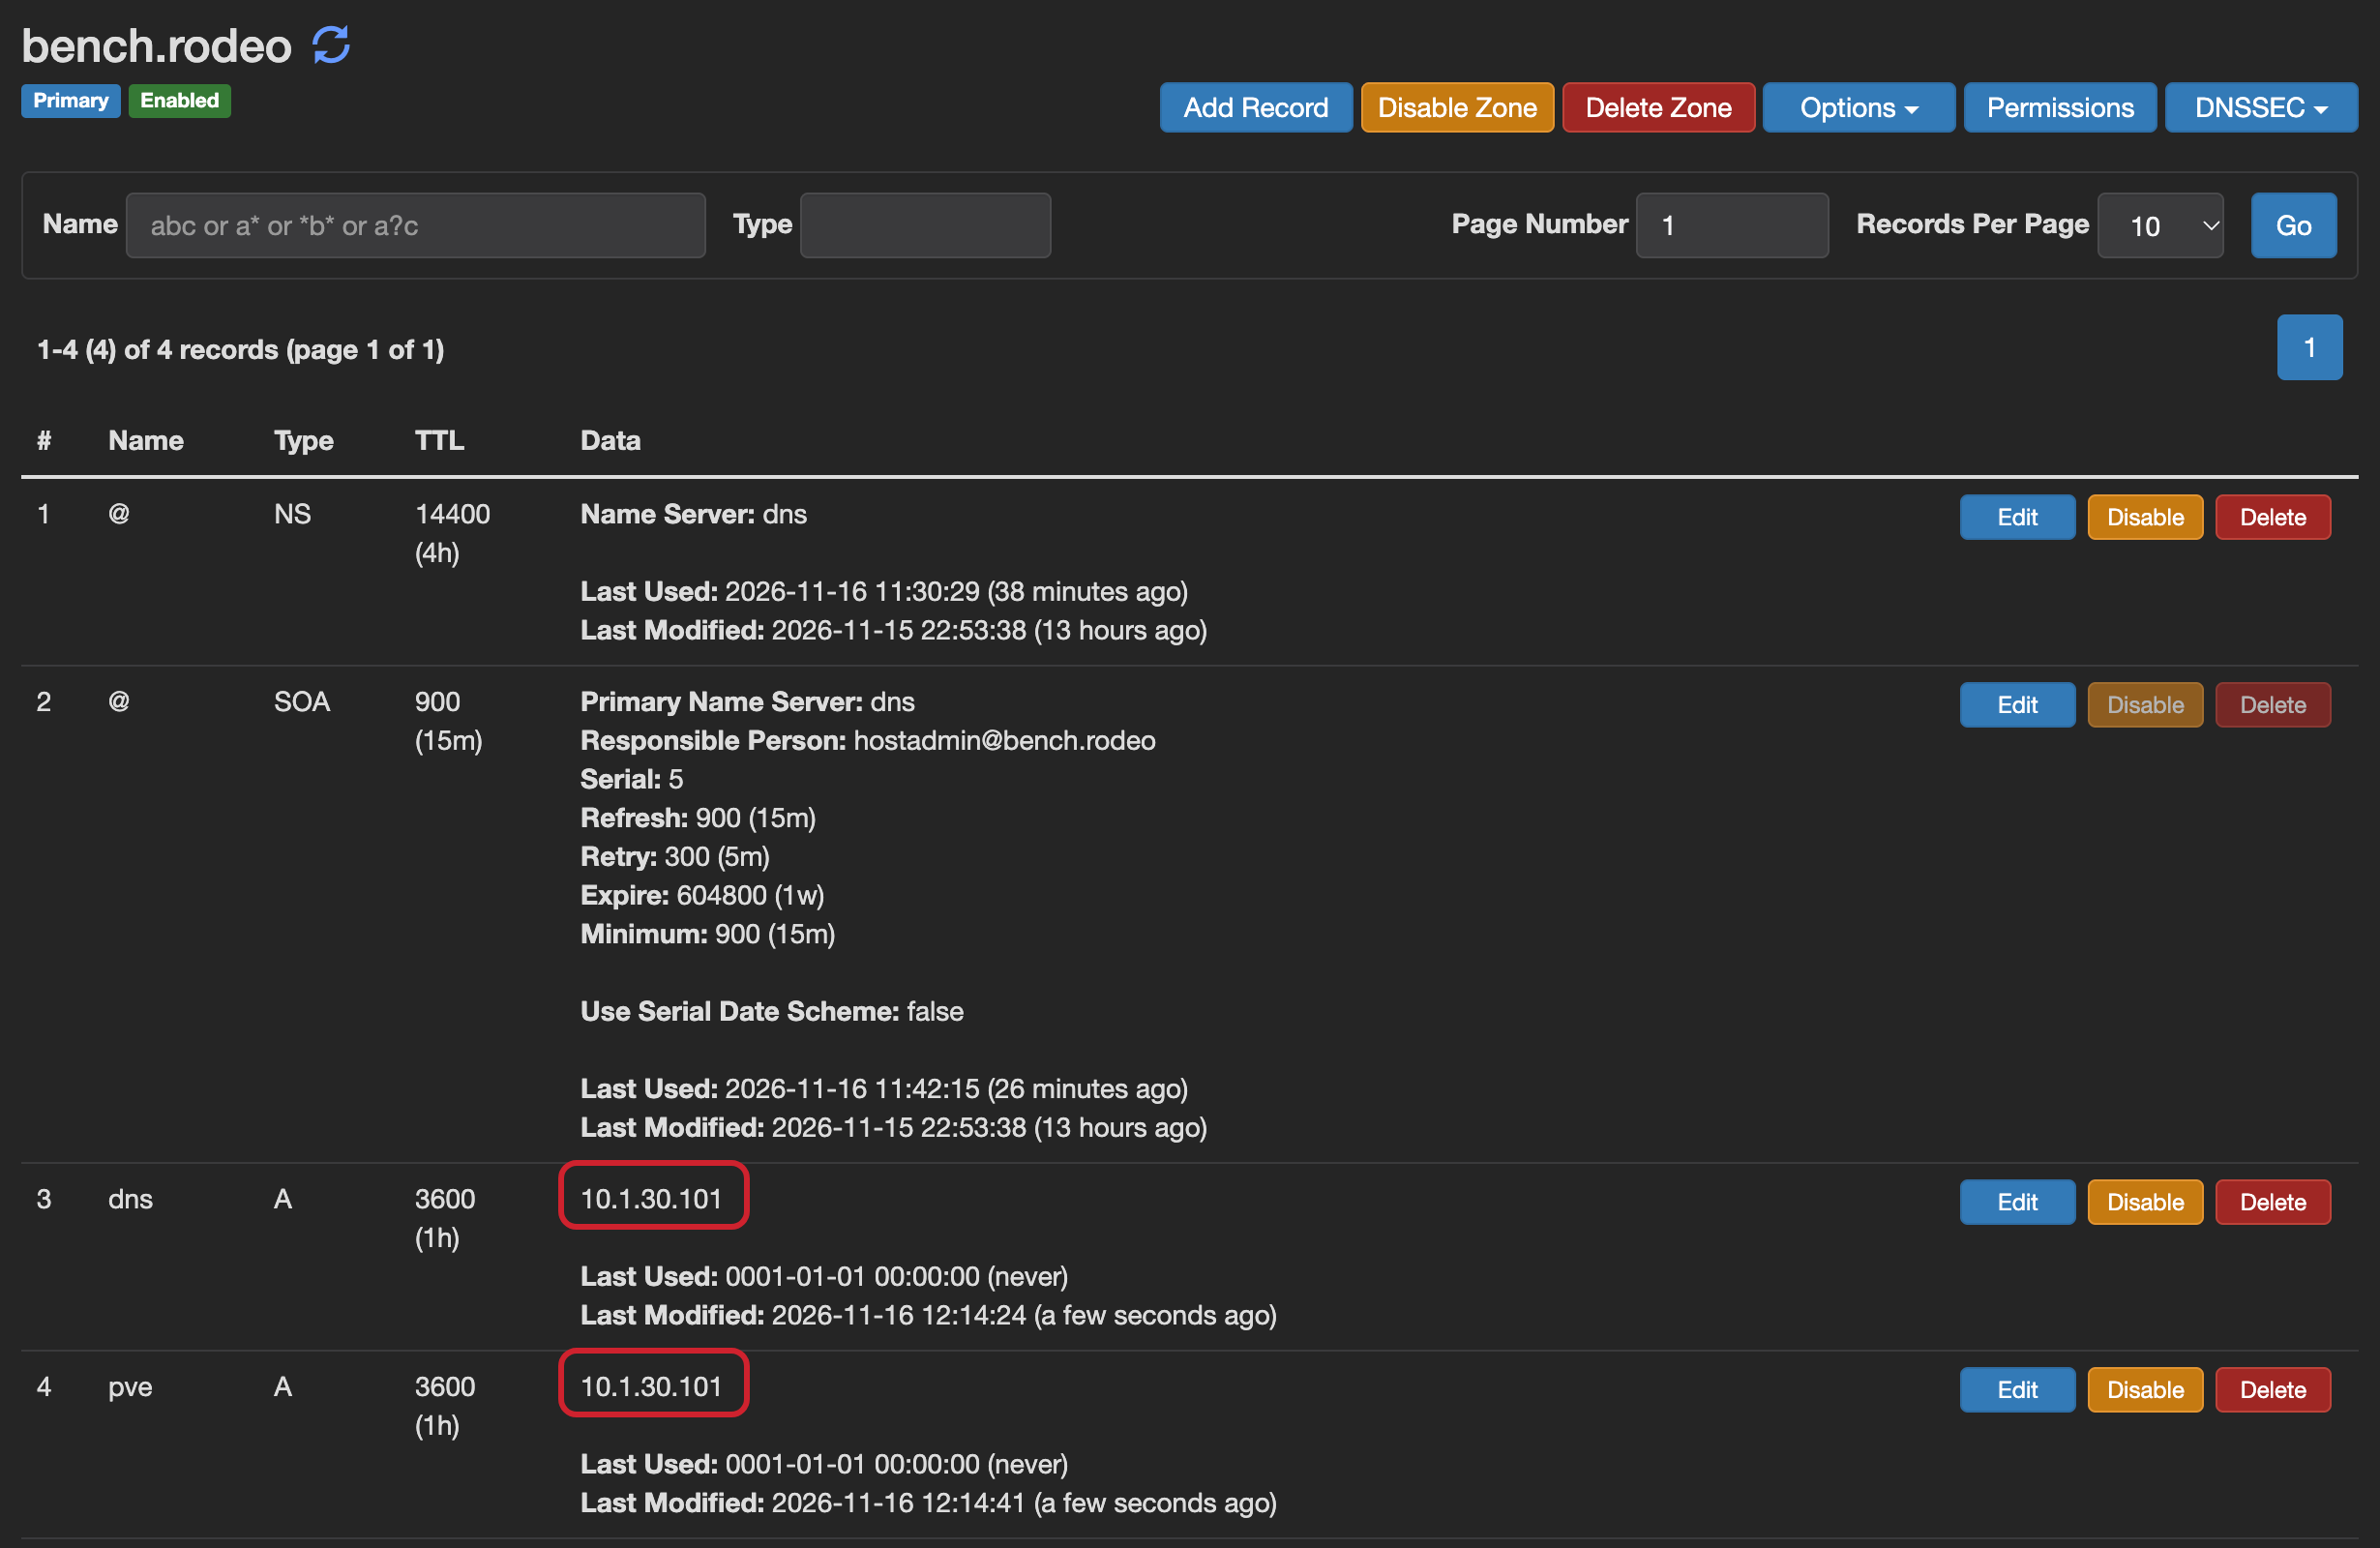
The names now lead to Caddy, and the services are still at their own addresses. http://10.1.30.100:5380 still opens the admin page directly. The address part 2 gave you, http://dns.bench.rodeo:5380, stops working: that name is Caddy's now, and Caddy doesn't listen on 5380.
NOTE
A device that looked up one of these names in the last hour may keep the old answer for up to an hour. That's the record's TTL, 3600 seconds. Turning Wi-Fi off and on usually clears it sooner.
Step 12: Open Them by Name
On the Proxmox host, ask your DNS server for both names.
dig +short @10.1.30.100 dns.bench.rodeodig +short @10.1.30.100 pve.bench.rodeodig asks a DNS server about a name, +short cuts the reply down to the answer, and the @ says which server to ask. Both should be 10.1.30.101.
On a computer or phone that uses your DNS server, which Step 13 of part 2 set up through your router, open https://dns.bench.rodeo. The admin page appears with a padlock, no warning and no port. Then https://pve.bench.rodeo: Proxmox's sign-in, with the padlock. Sign in and open a container's console to check it works through Caddy too.
Step 13: See What the Public Can See
Open crt.sh, the search for those public certificate logs, and search for your domain. A new certificate can take hours to show up there, so come back later if it isn't listed yet. The one Caddy got names only *.bench.rodeo, none of your services, which is what the wildcard bought you. If your domain had certificates before, from another server or from Cloudflare, those are listed too, with whatever names they carry.
Updating Caddy
Because Debian's package system no longer manages the program you run, apt upgrade won't update it. Caddy updates itself, keeping the plugin.
On the Proxmox host, enter the container.
pct enter 101Ask Caddy to fetch the newest build with the same plugins. upgrade replaces the file it runs from, and --keep-backup keeps the old one beside it as /usr/bin/caddy.custom.tmp, in case the new one misbehaves.
caddy upgrade --keep-backupThat only replaces the file. Check your settings still suit it, then restart Caddy so it runs the new one.
caddy validate --config /etc/caddy/Caddyfile --envfile /etc/caddy/cloudflare.envsystemctl restart caddyOpen both names again. If anything is wrong, put the old copy back with mv /usr/bin/caddy.custom.tmp /usr/bin/caddy.custom and restart Caddy again.
exitAdding a Service Later
Each later part of this series adds one block to the Caddyfile and one record to your DNS server. For a service at 10.1.30.105 on port 8080, for example, it goes like this.
On the Proxmox host, enter the container.
pct enter 101Open the Caddyfile.
nano /etc/caddy/CaddyfileGo to the end, paste the new block below the others, then save with Ctrl+X, Y, Enter.
uptime.bench.rodeo {
	reverse_proxy 10.1.30.105:8080
}
Check the file, the same way as in Step 8.
caddy validate --config /etc/caddy/Caddyfile --envfile /etc/caddy/cloudflare.envThe last line should say Valid configuration. Then tell Caddy to read it again. reload applies the change without dropping open connections, where restart would stop Caddy and start it again.
systemctl reload caddyLast, in your DNS server's admin page, add an A record for the new name pointing at Caddy's address, 10.1.30.101, the way you added records in part 2. The wildcard certificate already covers the name, so Caddy doesn't need to ask for anything.
Next Steps
Every service now has a name and HTTPS: the DNS server's admin page, Proxmox, and anything you add. Part 4 backs them up, with Proxmox Backup Server, so a broken container is something you restore rather than rebuild.
If I helped you learn something, please consider buying me a coffee.
Buy me a coffee